How are the art quests judged?
The art quests are not meant to be a competition between users, but rather individually judged based on overall effort and creativity. That means the entries are actively judged once they are submitted, and not only on the final day of the challenge, though we do look them over again at the end.
Quest entries are also judged by multiple team members. To ensure fairness, each of these members can discuss with the rest regarding passing/rejecting entries or moving an entry to a different category if there are differing opinions. That means your entry is never judged only by a single team member.
These are the following things we look for in a good quest entry:
-How much effort was put into the piece?
-How creative is the idea behind the entry?
-How well is the art executed?
How do I increase my chances of being picked for Top Picks or Gold Star?
No matter what your current skill level is, for those of you looking for ways to improve your art skills, we have a few suggestions that we hope might help! And keep in mind, practice makes perfect.
We also want to be clear these are just tips, but we encourage all types of creativity! Just because artwork doesn’t necessarily meet all or any of these suggestions doesn’t mean that it won’t be placed into a Gold Star or Top Picks category.
Photography:
- Make sure the subject of the photo is clear and the prompt is followed without doubt
- There aren't any background clutter present that don’t add value to your photograph
- Working with only two or three colors can help make your photo easy to understand
- These are not scavenger hunts, we expect a bit more than just finding the object to photograph
- You may set up your own still life or go out and find the perfect things to photograph
- Keep in mind your lighting and angles as well
- Use basic editing like brightness, contrast, saturation or even just cropping your image
Drawing:
- Use mediums that you are comfortable with and have easy access to use
- Using traditional mediums can be a better option than digital if you struggle to use a mouse
- Cropping your canvas around your drawing and centering your piece
- Having items interact together rather than floating in an empty space
- Coloring in your drawing, shading it, and/or adding background can really make a drawing pop!
Poetry:
- Proofread! Make sure that the prompt is clear in your text and the poem makes sense.
- While not required, we greatly encourage things like spell check.
- Use descriptive and symbolic words to spice up your writing
- Avoid turning your poem into a list of items
How do I know if my entry is accepted or rejected?
When you submit your work, your entry is set to pending and should have a yellow/orange border around it. It will stay this way until a staff member has had a chance to check through the submissions. Even if your entry is still pending by the challenge deadline, it will still count as being submitted and be approved or rejected by a staff member as soon as possible.
If your entry has a green border, it means that you have been approved. If you have been approved, you will get the prizes once the challenge has officially ended. After a contest ends, you may notice that your entry goes from a green border to a blue border, this means not only was your work approved, but you were also selected as a winner!
If your entry has a red border, it means your work has been rejected. Entries may be rejected for a number of different reasons, such as not following all of the requirements or using work that is not entirely yours. If your submission was rejected, you should also receive a post from Ovipets with the reason you were not approved. If it is something that can be fixed, you are always welcome to adjust your entry and resubmit, or create and submit a new entry.
What are the art quest tiers/categories?
We generally have 3 different tiers your entry can be placed in: Top Picks, Gold Star and Participation. The prizes won are different in each challenge and currently there are no rules regarding how many entries can be placed in each category.
We try to base our choices on effort and creativity put into a piece rather than the amount of skill a user has. We want to encourage all users to participate, regardless of where they are in their art journey.
Top Picks: These are the winners of the challenge. These are users we feel went above and beyond with their idea and execution of their submission.
Gold Star: This is the main category where the majority of entries usually fall as we try to reward users who have clearly put effort into their entry, even if they didn’t quite achieve Top Picks.
Participation: To encourage people to learn and hone their art skills instead of drawing quick doodles for the prize we added this category.
What are the different types of art quests I can enter?
Currently we have 3 different types of art quests that are run on a semi regular basis.
Photography: For photography challenges, you are tasked with taking a photo that clearly shows the prompt. Photo editing is allowed and even encouraged, but extreme photo manipulation that makes it hard to see the original image is not.
Drawing: For drawing challenges, you can use traditional or digital mediums to draw or paint the prompt. You may also paint on objects other than canvas (i.e. fabric painting), and paper craft is also acceptable if you prefer to make your image more three dimensional. At this point in time, no other craft types are accepted in the drawing challenge.
Poetry: For poetry challenges, you can write any type of poem as long as it is at least four lines long and the lines are more than just a single word or list of words.
What is considered traced or copied artwork?
Any form of tracing or copying existing artwork or photographs will not be accepted. This includes Ovipets artwork as well.
This would mean entries are rejected if users directly trace over an image, or if they eyeball it in an attempt to copy it (such as copying the exact position and features). Even if the image has minor changes made to it (such as a different tail), if the majority of the image is clearly traced or copied, it will not be approved. Referencing images to help with anatomy/posing is fine and encouraged, but trying to copy something is not.
You can, however, copy any artwork of photos that you personally have created, such as turning traditional pieces into digital, or creating your drawing based on your pet's photograph.
These are examples of what you should avoid:

The first is a full trace of a Vulpes, the second is a trace that has had its tail changed and head rotated, and the third is an eyeballed copy.
This is an example of what we encourage:
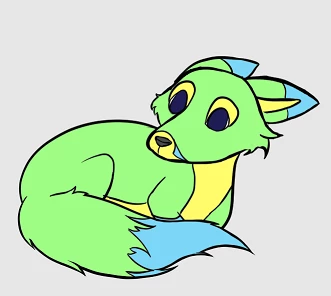
While still based on a Vulpes, and referencing photos of a curled up fox, this is not a copy of any existing photograph or drawing.
This would mean entries are rejected if users directly trace over an image, or if they eyeball it in an attempt to copy it (such as copying the exact position and features). Even if the image has minor changes made to it (such as a different tail), if the majority of the image is clearly traced or copied, it will not be approved. Referencing images to help with anatomy/posing is fine and encouraged, but trying to copy something is not.
You can, however, copy any artwork of photos that you personally have created, such as turning traditional pieces into digital, or creating your drawing based on your pet's photograph.
These are examples of what you should avoid:

The first is a full trace of a Vulpes, the second is a trace that has had its tail changed and head rotated, and the third is an eyeballed copy.
This is an example of what we encourage:

While still based on a Vulpes, and referencing photos of a curled up fox, this is not a copy of any existing photograph or drawing.
When will I receive the rewards for my submission?
All rewards are sent out after the challenge officially closes. This is generally slightly after the deadline for submissions, as staff members must double check and approve or reject any last minute entries.
In order to be eligible for prizes, your work must be approved. If you are rejected, you will not receive a reward.
In order to be eligible for prizes, your work must be approved. If you are rejected, you will not receive a reward.
Why was my submission rejected?
There are a number of reasons why an art challenge submission may be rejected. If your entry is rejected, you should also receive a post from Ovipets with the specific reason in your private messages. However, these are some of the most common reasons an entry is rejected and how to help ensure your work is approved:
- Any work that is stolen will automatically be rejected regardless of whether the entire work is not yours, or if part of it comes from elsewhere. This will also result in a ban from all current challenges. All work must be created by you and only you. This unfortunately means that under the current system, collaborations are not allowed.
- Any work must follow the prompt. If your entry appears to be missing any of the required theme(s), your work will be rejected with a note about what you are missing. You are welcome to add in the missing element and resubmit.
- Work must be specifically done for the event. No old work is accepted.
Specifically for Drawing Entries:
- Drawings should not use stamps, stencils, decorative brushes or typed text as the main part of the image. To be clear, using stamps/brushes/stencils to help decorate your background with things like leaves, trees, clouds, etc is perfectly acceptable. However, at least half of the image should be made entirely by you, and any part of the main prompt must be created by you as well. I.e. using a flower brush is generally fine to have in the background of your image, but would not be acceptable in a quest about flowers.
- Artwork should never include any element that is copied or traced. Any type of copying, whether it be from existing artwork, photographs or Ovipets material, will be rejected. It does not matter if some elements are different and not exact, tracing of any kind will not be approved.
- When drawing anthropomorphic or humanoid characters, they must have at least as much clothing/coverage as a normal swimsuit/bikini. Even if this rule is met, characters in particularly suggestive poses will still be rejected.
Specifically for Photography Entries:
- If you submit a photograph that includes a person in it, you will be asked to verify that the individual is 18+. If the individual is 18 or older, you can verify it and the image will be approved. Minors are not allowed to be fully shown in images, though things like just a hand are fine.
- Photographs of paintings or drawings will not be approved under the photography challenge, and should be submitted under the drawing/painting challenge if the artwork was made by you. If you are not able to access a real version of the prompt, fake ones are generally acceptable, such as fake flowers to replace real ones.
- Editing photos is allowed within reason. However, heavy photo manipulation or filters will be rejected if we cannot easily determine what the image is and verify that the underlying image is yours.
Specifically for Poem Entries:
- While we are not particular about grammar or spelling, please ensure that you break your poem up into separate lines and you will be asked to do so if your work appears to be paragraphs or a single long sentence.
- We are generally looking for lines to contain more than a list of words (i.e. sentence or sentence fragments). It is fine if some lines are a list of words or even only one word, but the entire poem should not be just a list of single words.
- All elements of the poem should be entirely written by you, and not have lines taken from any existing poems, songs, etc. This means any poem with a variation of "Roses are red, violets are blue" will automatically be rejected.
- While alluding to the prompt is generally fine, and you do not always have to include some of the key word suggestions, if it is hard for us to tell what your poem is about, you may be rejected. You can always explain your work when you are rejected though, and if we are able to understand your case, it will be approved.
Even if your entry was rejected, you can always fix the issue and resubmit, create a new entry to submit, or, if it was rejected due to some confusion, you can always try to clarify your case. You are welcome to respond to any rejection post made by Ovipets to you if you have any questions or concerns.
- Any work that is stolen will automatically be rejected regardless of whether the entire work is not yours, or if part of it comes from elsewhere. This will also result in a ban from all current challenges. All work must be created by you and only you. This unfortunately means that under the current system, collaborations are not allowed.
- Any work must follow the prompt. If your entry appears to be missing any of the required theme(s), your work will be rejected with a note about what you are missing. You are welcome to add in the missing element and resubmit.
- Work must be specifically done for the event. No old work is accepted.
Specifically for Drawing Entries:
- Drawings should not use stamps, stencils, decorative brushes or typed text as the main part of the image. To be clear, using stamps/brushes/stencils to help decorate your background with things like leaves, trees, clouds, etc is perfectly acceptable. However, at least half of the image should be made entirely by you, and any part of the main prompt must be created by you as well. I.e. using a flower brush is generally fine to have in the background of your image, but would not be acceptable in a quest about flowers.
- Artwork should never include any element that is copied or traced. Any type of copying, whether it be from existing artwork, photographs or Ovipets material, will be rejected. It does not matter if some elements are different and not exact, tracing of any kind will not be approved.
- When drawing anthropomorphic or humanoid characters, they must have at least as much clothing/coverage as a normal swimsuit/bikini. Even if this rule is met, characters in particularly suggestive poses will still be rejected.
Specifically for Photography Entries:
- If you submit a photograph that includes a person in it, you will be asked to verify that the individual is 18+. If the individual is 18 or older, you can verify it and the image will be approved. Minors are not allowed to be fully shown in images, though things like just a hand are fine.
- Photographs of paintings or drawings will not be approved under the photography challenge, and should be submitted under the drawing/painting challenge if the artwork was made by you. If you are not able to access a real version of the prompt, fake ones are generally acceptable, such as fake flowers to replace real ones.
- Editing photos is allowed within reason. However, heavy photo manipulation or filters will be rejected if we cannot easily determine what the image is and verify that the underlying image is yours.
Specifically for Poem Entries:
- While we are not particular about grammar or spelling, please ensure that you break your poem up into separate lines and you will be asked to do so if your work appears to be paragraphs or a single long sentence.
- We are generally looking for lines to contain more than a list of words (i.e. sentence or sentence fragments). It is fine if some lines are a list of words or even only one word, but the entire poem should not be just a list of single words.
- All elements of the poem should be entirely written by you, and not have lines taken from any existing poems, songs, etc. This means any poem with a variation of "Roses are red, violets are blue" will automatically be rejected.
- While alluding to the prompt is generally fine, and you do not always have to include some of the key word suggestions, if it is hard for us to tell what your poem is about, you may be rejected. You can always explain your work when you are rejected though, and if we are able to understand your case, it will be approved.
Extra Note
Even if your entry was rejected, you can always fix the issue and resubmit, create a new entry to submit, or, if it was rejected due to some confusion, you can always try to clarify your case. You are welcome to respond to any rejection post made by Ovipets to you if you have any questions or concerns.
Bought/adopted a pet but it’s not in my pets tab!
Then the pet must be unnamed, check your Hatchery tab to find and name it. Make sure you name it before it runs out of food or it will be discarded.
Can other users hatch my eggs?
No, so no need for worries, only the owner can do the last turn for an egg and thereby hatch it.
Don’t leave an egg unhatched for too long though as they will be automatically discarded if left unturned for 10 days. If left unturned for 5 days, a little exclamation mark will show in the corner of the eggs picture to warn you that the egg only have a few days left before being discarded - as if it's left unturned for to long, the embryo inside the egg will have died.
Don’t leave an egg unhatched for too long though as they will be automatically discarded if left unturned for 10 days. If left unturned for 5 days, a little exclamation mark will show in the corner of the eggs picture to warn you that the egg only have a few days left before being discarded - as if it's left unturned for to long, the embryo inside the egg will have died.
Enclosures to separate and organize my pets?
Adding new enclosures
Click the "Add Enclosure" button on the bottom of you tab list. If you're new, you'll only have the "Pets" one. You can easily add a new one by clicking the "Add Enclosure" button at the bottom. After you've named it you'll see it show up in your tabs.
You can also add new enclosures by going to a pets profile page, click the “Edit” button and then there you have the field set called “Enclosure”. There you click the “ + “ sign and a pop-up will appear asking you to name your new enclosure. Name it and it will appear in the bottom of your enclosure drop down menu, choose it and click "Update" and the pet will be moved there.
Moving pets into a new enclosure
To move other pets into a new enclosure, either grab their image with your mouse and drag and drop them to the name of your new enclosure or move them by going to their profile and clicking the "Edit" option then selecting the enclosure you would like to move the pet into. To move multiple pets at once, click and hold a pet's image to select it, then select all the pets you wish to move, or hit the "Select All" button at the top of the enclosure. Once they are all selected, click the "Move to Enclosure" button also at the top of the enclosure and select the new enclosure from the drop down menu.
Merging/Deleting enclosures
To delete an enclosure select the option at the bottom of the tab you want to delete. The pets in that tab will then be transferred into another enclosure of your choosing. If you don't select a tab, the pets will be sent to your original default enclosure
Adding presentations to enclosures
Simply click the top box in the enclosure you wish to add a presentation to, you will then receive the option to add text to the enclosure. You can add the same formatting and images/links to the enclosure presentations as you can to comments and posts in forums. To learn how to format presentations and comments, read the "Adding images and other formatting to comments?" section of the FAQ.
Organizing Pets in an Enclosure
Organizing your pets is a very simple drag and drop procedure. Just click and hold the image of your pet and drag it around the enclosure until it is where you want it to be and and then let go. The pet will have moved to that new location.
You can also use the "Sort" button at the bottom of an enclosure to sort your pets alphabetically, or by gender, species, mutation number or hunger level.
How do I feed/care for my pets?
You can feed your pets by clicking the “Feed” button in their profile, and this method doesn’t cost anything. The profile is the page you get to when you click the pets image or name which also contains links to the pets pedigree, color information etc.
When your pet only have 5 days of food left, a little exclamation mark in red will appear on your pets image to alert you that the pet in question needs feeding. Keep in mind that different OviPet species needs food at different frequency so keep an eye out for those exclamation marks.
If you're a paid user, you also have the option to "Mass Feed" your pets. Mass feed costs 1 credit per 6 pets always rounding up (so mass feeding 7 pets costs 2 credits, and so does mass feeding 12 pets). Just click the button at the bottom of the tab to mass feed all your pets. If you have starving pets, a "Mass Feed Starving" button will appear at the top of the tab, to minimize the risk of a pet starving to death in the bottom of a big tab without you noticing it.
If you have Ovi+, your pets will stay fed automatically during the duration of your subscription.
How do I find my inventory and the store? And how do I purchase and store mutations?
To find the inventory, go to your Trade tab. Right below the header Finances, there should be a spot that says Inventory. If you have any quick hatches, multi splices, cooldowns or own Ovi+, you will also see that information there.
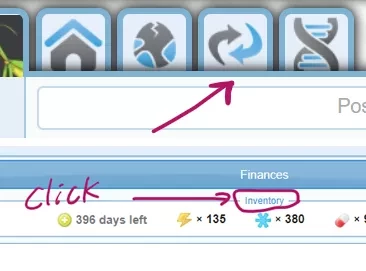
If you click on it, it will open up your inventory which shows tabs on the left for the current splices that you own, backgrounds that you have, and, if you are a paid member, a separate tab on the right for the store. Your inventory just allows you to see the items that you already own. To use any of these items, you will need to go to the pet and choose to splice the mutation you want, or use the background you own.
If you are a paid member and you click on the store tab, you will see all of the available limited splices that are currently available to purchase. However, you will only see the mutations for species you have researched to level 5 and for the season you are currently in (or any exclusive event that may be occurring at that time). You may purchase any limited or exclusive mutation that is currently out. Once you purchase a mutation, it will be stored in your inventory for future use. When you go to splice a pet with a mutation that you own that is still in season, you can either click on the option to use a mutation you bought (it will show the number of splices owned), or pay for a new splice (it will show the cost of the splice).
Keep in mind that you can only purchase limited mutations of the season you are currently in, and can only buy exclusives during the duration of their event. Other seasonal mutations will not be available for purchase, and no past exclusive or charity mutes will be available in the store. However, once you purchase a mutation, you can use it at any time in the future, so it can be very helpful for planning out future projects and pure lines!
How do I find new friends?
You use the "Friend Finder" in the Search.
Just click the "Find Users looking for new Friends" button and you will see all other people who've looked for friends in the past two hours. You then will also show up in this search to other users who are looking for new friends.
This way you can easily find active users who are looking for new friends to add to your friends list.
How do I find pets available for breed from other users?
Go to the Search page. Select the species from the pictures and then to search for pets up for general breed trade (not for breed for a credit fee), just click the "Breed" button and it will bring up all pets available for breed with the other criteria you entered.
To search for pets for direct credit breed, simply press the "Breed" button and a little "Max Price" area will pop out, enter your max price and search. This will only bring up pets available for direct breed with a price lower or equal to your max price set in your search. To find ones that are available for free breed, just set a max price of 0 credits.
You can search for pets for breed not only from your friends, but also from the different groups you're a member of by changing the "Friends" drop down to one of the groups.
Also of note, if you see but no price set up:
This means the pet is set on the trade breed function. This can allow for a breed trade to be performed for payment other than credits, for them to limit the public breeding to only certain other users, or to allow other users to check the pet's compatibility (often used for pure lines where users are trying to find a compatible mate).
You should always check the users page and tabs as they likely have their rules listed somewhere, or you can message them if you are unsure.
To search for pets for direct credit breed, simply press the "Breed" button and a little "Max Price" area will pop out, enter your max price and search. This will only bring up pets available for direct breed with a price lower or equal to your max price set in your search. To find ones that are available for free breed, just set a max price of 0 credits.
You can search for pets for breed not only from your friends, but also from the different groups you're a member of by changing the "Friends" drop down to one of the groups.
Also of note, if you see
This means the pet is set on the trade breed function. This can allow for a breed trade to be performed for payment other than credits, for them to limit the public breeding to only certain other users, or to allow other users to check the pet's compatibility (often used for pure lines where users are trying to find a compatible mate).
You should always check the users page and tabs as they likely have their rules listed somewhere, or you can message them if you are unsure.
How do I find pets for trade/sale from other users?
Go to the Search page. Select the species from the pictures and then to search for pets up for general Trade (not for sale for a credit fee), just click the "Trade" button and it will bring up all pets available for trade with the other criteria you entered.
To search for pets for direct credit sale, simply press the "Trade" button and a little "Max Price" area will pop out, enter your max price and search. This will only bring up pets available for direct buy with a price lower or equal to your max price set in your search.
You can search for pets for trade not only from your friends, but also from the different groups you're a member of by changing the "Friends" drop down to one of the groups.
Also of note, if you see but no price set up:
This means the pet is set to general public trading. This can allow for trade to be performed for payment other than credits, for them to give away free pets (but limit who can adopt or how many a single user can adopt), or as a way to sell breeding pairs or multiple pets at once (i.e. often the female of a breeding pair is set to trade so users can open a trade and the owner can add the compatible male so both pets and the credits are exchanged in one transaction)
You should always check the users page and tabs as they likely have their rules listed somewhere, or you can message them if you are unsure.
To search for pets for direct credit sale, simply press the "Trade" button and a little "Max Price" area will pop out, enter your max price and search. This will only bring up pets available for direct buy with a price lower or equal to your max price set in your search.
You can search for pets for trade not only from your friends, but also from the different groups you're a member of by changing the "Friends" drop down to one of the groups.
Also of note, if you see
This means the pet is set to general public trading. This can allow for trade to be performed for payment other than credits, for them to give away free pets (but limit who can adopt or how many a single user can adopt), or as a way to sell breeding pairs or multiple pets at once (i.e. often the female of a breeding pair is set to trade so users can open a trade and the owner can add the compatible male so both pets and the credits are exchanged in one transaction)
You should always check the users page and tabs as they likely have their rules listed somewhere, or you can message them if you are unsure.
How do I get other species available in the search?
To get a new species to show up in the search you have to research it. Some species are available right away to all for "free discovery". Those you can just click the "discover" button in the lab and then the species will be available to you in the search.
Other species must be owned before being able to research. To do so, adopt one from the Adoption Center or from a friend and you can then research them to make them available to search for.
Yet other species are available instantly to research for paid users.
All species are available instantly to research for members with an Ovi+ subscription.
How do I put a pet up for public breeding?
You can put pets up for general breed or for instant breed for a set credit price. You do this in the "Edit" section of the pet's Profile.
If you want to control who breeds with the pet, or trade breedings for other breedings and/or for other pets instead of just credits, just click the "Breed" button and the pet will be show as up for breed for other users (the little red heart icon will appear on their image). Then other users will be able to send you different breed trade offers.
You can also put pets up for breeding too for a set price. By pressing the "-" button next to the "Breed" icon you will get a popup in which you can set a breeding fee. Pets up for breed for a fee can be bred by any one of your friends or members in the same group as you directly, without opening a trade request and without approval from your side for the fee you've set. You can set the fee to 0 for free breeding.
How do I sell a pet?
You can put pets up for general trade or for sale for a set credit price. You do this in the "Edit" section of the pet's Profile.
If you want to know who the pet goes to, or trade for other pets and/or breedings instead of just credits, just click the "Trade" button and the pet will be show as up for trade for other users (the little coin icon will appear on their image). Then other users will be able to send you different trade offers.
By pressing the "-" button next to the "Trade" icon, you will get a popup in which you can set a sale price. Pets up for sale can be bought by any one of your friends or members in the same group as you directly, without opening a trade request and without approval from your side.
If you set the price of a pet to 0 credits, the pet will be put up for "Adoption" in your enclosure. Meaning anyone of your friends and or members in the same group as you can adopt the pet from you directly for free. To clarify, the pet will not be sent to the Adoption Center but will stay in your enclosure/hatchery.
I want to research a new species, but it’s not available on my Lab page?
For more advanced species you need to own a pet of the desired species to be able to research it. If you're lucky you might find one in the Adoption Center, or you might be able to trade for one from a friend or by joining a group dedicated to the species in question.
All species are available for research immediately for users with an Ovi+ subscription.
All species are available for research immediately for users with an Ovi+ subscription.
Instant Research?
Instant Researches are items that allow you to instantly finish any mutation research. Do note that these do not work to research a level, only the mutations. To use it, you must first start the desired research under the lab tab. Once you have begun researching, if you refresh the page, you should see a pop up to use the Instant Research to finish the research instantly.
My pets died! Can I get them back?
Yes of course! Just locate them using the Search, go to the "My Pets" tab and click the "Search Dead" button. Go to their profile and click the "resurrect" button.
You can also resurrect pets that died in a specific enclosure by going to that enclosure and using the "Filter" option to show the last 100 deceased pets in that enclosure. Here you can also choose to use the mass revive feature to resurrect all these pets in one go.
Please be aware that pets will eventually be deleted by the system if they aren't resurrected.
Eggs/Pets that are unnamed or unhatched will be discarded after a while. Please make sure that if you want to keep a pet that it needs to be named. You will be unable to resurrect any unnamed pets that have died.
OviPets Newspost Etiquette
When OviPets makes an official news post, it's required from our users that you stay on topic. Failure to stay on topic may result in either a ban from just the post in question, or a total ban from posting in all future OviPets posts. If you get banned from posting in future OviPets posts, you will not be able to participate in OviPets contests, so please make sure you stay on topic.
Pets and genes, will OviPets be adding more?
Yes! New pets and genes are constantly in the works behind the scenes here at OviPets.
If you have any ideas you think would make a good addition to the game, you are welcome to send your suggestions to our email at suggestions@ovipets.com. Please know that while all will be read, we unfortunately don't have the manpower to reply to each suggestion email.
If you have any ideas you think would make a good addition to the game, you are welcome to send your suggestions to our email at suggestions@ovipets.com. Please know that while all will be read, we unfortunately don't have the manpower to reply to each suggestion email.
Pets, I want to get more?
You get more pets from the Adoption Center, by buying or adopting them from other users (you can Search for pets for trade in the search) or by generating them from your Lab page after you’ve discovered or researched the species in question.
Popularity Badges
The popularity badges are awarded when a pet gets a lot of likes.
Over 20 likes - Popular =
Over 50 likes - Very Popular =
Over 100 likes - Extremely Popular =
Over 20 likes - Popular =
Over 50 likes - Very Popular =
Over 100 likes - Extremely Popular =
Splicing an egg with genes?
To splice an egg with a mutation, you first have to have researched a mutation for that species on your Lab page. Once the research is finished, the mutation will be available when you click the "Lab" button on your eggs profile page (the page you get to when you click the egg). Click the "Lab" button and you will get the option to splice the egg with one of all mutations you've researched for that species.
Think twice before you splice!
Be careful, as splicing costs credits and can only be done once to an egg so choose carefully. Also, an egg can be spliced with a mutation the pet would have inherited naturally from it's parents so you may want to check the pedigree or do a DNA Profile before splicing.
If you add a splice but change your mind, you can undo this by doing a DNA Profile on the pet, using the Removal Splice option to remove the splice used on the pet, and then adding a new, different splice.
You may DNA profile an egg before adding a splice. Please be aware that splicing gender onto an egg will use up your 1 splice available for that egg.
I saw someone splice an egg twice!
This is a special circumstance where the user had something called "Multi Splices" available to use. These are a special prize normally found from the Advent Calendar available around the Winter holiday on Ovipets. Users are only given a limited number of these splices. These can also be purchased occasionally in the bundles offered at certain times throughout the year. A Multi Splice will allow a user to splice 2 mutations onto an egg of their choice.
The Adoption Center (AC), how does it work?
The Adoption Center is a great place to find ones first pet's. The pets in there are free, but you can only adopt one every 5 minutes.
It's refilled by generous players who sends their unwanted pets there for other players to adopt. You can send your pets there by going to their profile (click on the name), and click the "Edit" button. There you have an option called "Send To". When you click it, you will have the option to either discard your pet (discarded pets can never be brought back into the game) or put it up for adoption. To send multiple pets to the Adoption Center at once, click and hold a pet's image to select it, then select all the pets you wish to move, or hit the "Select All" button at the top of the enclosure. Once they are all selected, click the "Send to Adoption Center" button at the bottom of the enclosure.
Once a pet is put up for adoption, you can't retrieve it unless you get very lucky and manage to stumble upon it when it's available for adoption. So be careful when sending away pets so you don't regret it afterwards!
Our team can not bring back pets who have been sent to the Adoption Center.
Vacation mode, how does it work?
Vacation mode is a button that can be found in your profile. When pressed, it will suspend all activity on your account for the time needed for a maximum of a year but for a minimum of 1 week - so don't turn it on if you don't need it. You can, however, exit vacation mode early for a fee.
When your account is in vacation mode your will not be able to interact with your pets, breed, trade, send friend requests, vote on polls, etc. You will, however, still be able to use the feed to communicate with your friends or comment on news posts. When in vacation mode, your pets will get 100% food for for the duration of the vacation, but once vacation mode is turned off, it will all go back to the exact same state as when you turned it on. Meaning that if your pets where near starvation when you turn it on, they will still be so when you turn it off. So be careful with that to make sure you don't lose any pets or eggs by mistake when you return! Pets will only be kept in a "stasis" state for up to 1yr.
All users on vacation mode will have a little red square on their profile image to let you know they can't trade, breed, etc during that time.
What are stickers and how do I use them?
Stickers can be found in your inventory and bought from the store, both found in the trade tab. To put one (or more!) on your pet, click on the pet you wish to customize, hit the edit tab, and then click the stickers button in the customize section.
From there, you can click on a sticker you have in your inventory to add it to your pet. Once a sticker is applied, you can adjust it in a number of ways!
By clicking and dragging the rotate option in the bottom left, you can turn the sticker around to any angle you'd like. By clicking and dragging the sizing option in the bottom right corner, you can expand or contract the size of the sticker to make it as big or small as you'd like. If you click and drag in any other part of the sticker, you can move it around the frame of the pet to place it wherever you'd like. If you want to reset the size/rotation/location of the sticker, you can click it up above the pet in the "wearing" section.
Once you are satisfied with the way it looks, you can click the update button. If you should ever want to take a sticker from a pet, you can click the remove button to send it back into your inventory for later use.
Keep in mind that some of these stickers are seasonal! Limited stickers are only available in the store during their season, but they will return again the next year. In the event of any exclusive stickers being released, once they leave the store, they will not return. However, once you purchase any sticker, whether regular, limited or exclusive, they will stay with you in your inventory, or on your pets, even after they leave the shop.
We hope you have a blast being able to customize your pets, and cannot wait to see what fun ideas you come up with!
What does it mean when you "lock a pet?"
When you check a pet's profile you will see a "lock icon" that appears. If you select to "lock a pet", it will lock the current tattoos a pet might have and prevent users from altering them if the pet comes under new ownership. This is a way to help prevent users from lifting or altering tattoos on a pet they have obtained off a different user.
Locking a pet will also lock the name and presentation of an unregistered pet and prevent it from being altered by any future owner. For registered pets, however, the presentation can be altered even if a pet is locked, because pets in a project registry have a second presentation that can only be changed by the owner of the registry.
Locking a pet will also lock the name and presentation of an unregistered pet and prevent it from being altered by any future owner. For registered pets, however, the presentation can be altered even if a pet is locked, because pets in a project registry have a second presentation that can only be changed by the owner of the registry.
What is the max size for tattoos?
The max tattoo size is 100KB. The reason we don't allow bigger is to make sure pet file sizes remain within a reasonable limit and not make them slow to load. :)
Breeding for mutations? How are they inherited? What is dominance?
All pets have a set number of base genes (such as their standard body/tails/ears etc) which all have 100 dominance. The lower the dominance, the more “recessive” a gene is, meaning the lower the number, genes with a higher dominance will show before that gene does if a pet carries two different genes. Dominance only affects which mutation shows if a pet carries two, it does not affect the likelihood of it passing to offspring.
So let’s start with the most “basic” of pets on Ovi, the generated pet, and further narrow our focus only to the body mutation slot. This generated Vulpes has absolutely no visible mutations, and since it has no pedigree at all, it cannot possibly carry any mutations from its ancestors.
(All generated pets have the little wand symbol in the top left corner by their gender)
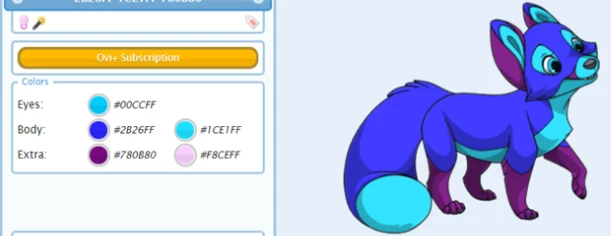
Therefore, both of its genes for the body slot are “Normal”, which we would say she has the genes “NN”. Because both of its genes are the same, it is obvious that this fox will display this “Normal” gene. In other words, it has no visible body mutation.
There are also a large number of available mutations (the ones you can splice in and research for in the “Tech Trees” in the “Research” area on your Lab page) for each pet which all have different dominance. The first thing you need to know is that only genes on the same “loci” (for example “Tail”, “Ears”, “Wings”) interact. What tail your pet has doesn’t matter when you’re breeding for wings, for example. You can see what “loci” a gene is located on when you go to an egg to splice it. There it will show up with first a body part name, for example: “Body” (this is the “loci”) and then there will be the name of the gene just below it, for example “Sock Body”.
Another simple example is a pet that was spliced. As you can see by the pedigree, this male is the son of two generated pets (as there is no further pedigree past the parents) and was just spliced with the sock body mutation.
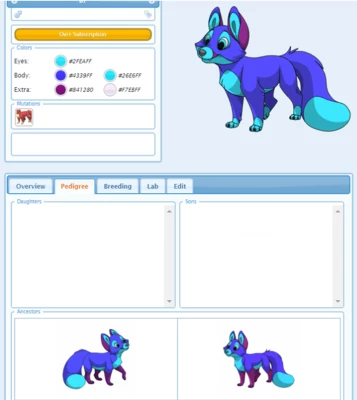
A splice replaces all the genes with that specific mutation. Thus, both of its genes for the body slot are “sock body” now, meaning it has the genes “SS” (S for “Sock Body”). Again, since both the genes it has are the same, it would make sense that this fox will display the sock body mutation.
Now you wonder what will happen if you breed those two. The female will give a “Normal body" gene to the offspring and the father will give a “Sock Body" gene. This means that the offspring in that loci will have one Normal gene and one Sock Body gene as each loci always have two genes.
To make this a bit easier to understand what genes exactly your pet will show, we can use something called “Punnett Squares”. The Punnett square is a diagram that is used to predict an outcome of a particular cross or breeding experiment. It is named after Reginald C. Punnett, who devised the approach. This is how we can calculate the various outcomes of the breeding, each square represents a 25% chance of that outcome:
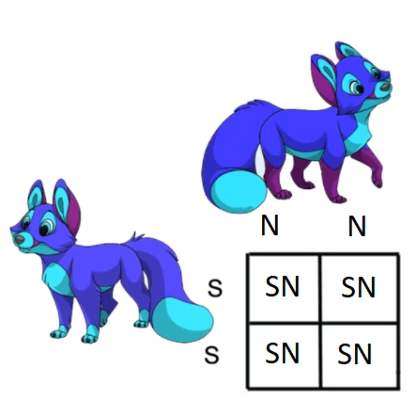
In this case, since both of the parents each had the same two genes in the body slot, all of the offspring have the same result, “SN”. However, now each of the offspring carry two different genes, a “sock body” gene and a “normal” gene. To determine which gene will show depends entirely on dominance.
So let’s take a quick detour to explain “dominance”. When you go to the lab and look at the mutations under research, you can hover over each to see the dominance. In this case, we can see that sock body has a dominance of 60:
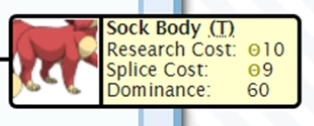
Any base or "normal" gene has 100% dominance. Thus, any offspring of this pair will show the “Normal Body” gene, and thus have no body mutation, but will carry the Sock Body gene. This means that any time you breed to a generated pet, you will *never* get a mutation to show. Mutations do not randomly pop out of nowhere, so the only way to get mutations using generated pets is to splice them on. However, if you are breeding it to another pet with a mutation, they will carry the gene, even if it is not visible. In this situation, we would get an offspring similar to this one:
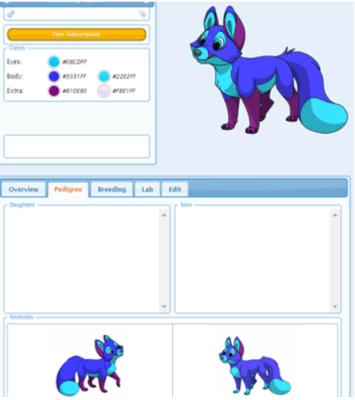
Here comes the fun part. Since you know the father gave the offspring a Sock Body gene, it means that the offspring is a “carrier” of the Sock Body gene. Meaning that the pet you just bred has one such gene in its DNA, even if it’s not visible - if you breed that pet to another pet with a Sock Body, there’s a 50% chance that the carrier pet will give their offspring the Sock Body gene instead of its Normal Body gene, and thereby giving that baby a visible Sock Body. To show this, we can make the following Punnett square using our new offspring and a female that shows the Sock Body gene.
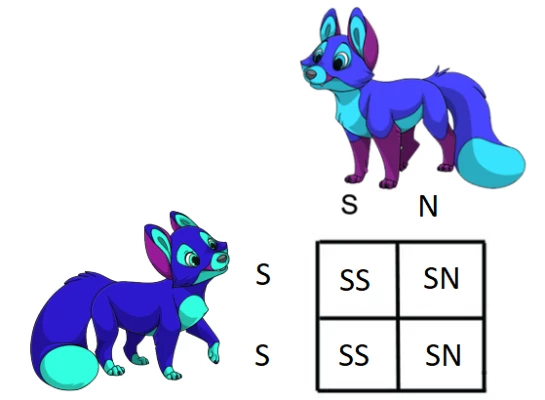
Thus, we have a 50% chance that the offspring will have the genes “SN”, with the “Normal” gene being dominant and no mutation showing but still carrying the Sock Body gene just like it’s father. However, we also have a 50% chance that its genes will be SS and showing the Sock Body gene like its mother.
You can draw your own Punnett square for any kind of breeding scenario to figure out the outcomes of a breeding.
So let’s start with the most “basic” of pets on Ovi, the generated pet, and further narrow our focus only to the body mutation slot. This generated Vulpes has absolutely no visible mutations, and since it has no pedigree at all, it cannot possibly carry any mutations from its ancestors.
(All generated pets have the little wand symbol in the top left corner by their gender)

Therefore, both of its genes for the body slot are “Normal”, which we would say she has the genes “NN”. Because both of its genes are the same, it is obvious that this fox will display this “Normal” gene. In other words, it has no visible body mutation.
There are also a large number of available mutations (the ones you can splice in and research for in the “Tech Trees” in the “Research” area on your Lab page) for each pet which all have different dominance. The first thing you need to know is that only genes on the same “loci” (for example “Tail”, “Ears”, “Wings”) interact. What tail your pet has doesn’t matter when you’re breeding for wings, for example. You can see what “loci” a gene is located on when you go to an egg to splice it. There it will show up with first a body part name, for example: “Body” (this is the “loci”) and then there will be the name of the gene just below it, for example “Sock Body”.
Another simple example is a pet that was spliced. As you can see by the pedigree, this male is the son of two generated pets (as there is no further pedigree past the parents) and was just spliced with the sock body mutation.

A splice replaces all the genes with that specific mutation. Thus, both of its genes for the body slot are “sock body” now, meaning it has the genes “SS” (S for “Sock Body”). Again, since both the genes it has are the same, it would make sense that this fox will display the sock body mutation.
Now you wonder what will happen if you breed those two. The female will give a “Normal body" gene to the offspring and the father will give a “Sock Body" gene. This means that the offspring in that loci will have one Normal gene and one Sock Body gene as each loci always have two genes.
To make this a bit easier to understand what genes exactly your pet will show, we can use something called “Punnett Squares”. The Punnett square is a diagram that is used to predict an outcome of a particular cross or breeding experiment. It is named after Reginald C. Punnett, who devised the approach. This is how we can calculate the various outcomes of the breeding, each square represents a 25% chance of that outcome:

In this case, since both of the parents each had the same two genes in the body slot, all of the offspring have the same result, “SN”. However, now each of the offspring carry two different genes, a “sock body” gene and a “normal” gene. To determine which gene will show depends entirely on dominance.
So let’s take a quick detour to explain “dominance”. When you go to the lab and look at the mutations under research, you can hover over each to see the dominance. In this case, we can see that sock body has a dominance of 60:

Any base or "normal" gene has 100% dominance. Thus, any offspring of this pair will show the “Normal Body” gene, and thus have no body mutation, but will carry the Sock Body gene. This means that any time you breed to a generated pet, you will *never* get a mutation to show. Mutations do not randomly pop out of nowhere, so the only way to get mutations using generated pets is to splice them on. However, if you are breeding it to another pet with a mutation, they will carry the gene, even if it is not visible. In this situation, we would get an offspring similar to this one:

Here comes the fun part. Since you know the father gave the offspring a Sock Body gene, it means that the offspring is a “carrier” of the Sock Body gene. Meaning that the pet you just bred has one such gene in its DNA, even if it’s not visible - if you breed that pet to another pet with a Sock Body, there’s a 50% chance that the carrier pet will give their offspring the Sock Body gene instead of its Normal Body gene, and thereby giving that baby a visible Sock Body. To show this, we can make the following Punnett square using our new offspring and a female that shows the Sock Body gene.

Thus, we have a 50% chance that the offspring will have the genes “SN”, with the “Normal” gene being dominant and no mutation showing but still carrying the Sock Body gene just like it’s father. However, we also have a 50% chance that its genes will be SS and showing the Sock Body gene like its mother.
You can draw your own Punnett square for any kind of breeding scenario to figure out the outcomes of a breeding.
Cloning?
The cloning feature allows you to create an exact copy of a pet. The clone will start as an egg, which you then can splice. You can't clone a clone and it will share the same pedigree as the original. A cloned pet is considered to be basically the same as the original pet when it comes to breeding. Anything related to the original pet will be related to the clone. Even a clone of a generated pet cannot breed with the original. You can use this feature once you reach level 5 of a species, and only on pets that are named.
Cloning is extremely expensive and the reason for this is that it otherwise would risk devaluing other pets. It's a powerful tool that's not meant for everyday use, but can come in handy in some rare cases.
Cloning is extremely expensive and the reason for this is that it otherwise would risk devaluing other pets. It's a powerful tool that's not meant for everyday use, but can come in handy in some rare cases.
Cooldowns?
Cooldowns are used to instantly make a female able to be bred again, regardless of how long is left of their cooldown. To use, go to the female you wish to breed, click on the lab tab of the pet, and then click the Cooldown option. Now you will be able to breed with her!
DNA Profile, what is it and how does it work?
DNA profiling allows you to analyze a pets DNA for a fee to see what different genes a pet both carries and shows. You can use this on adult pet or eggs. When using a DNA profile on eggs, it can help to determine gender and make sure you don't splice the pet with a gene that's already showing.
Once you've analyzed a pets DNA, you (and all other users) will always be able to see exactly what mutations that pet is carrying in it's profile. You can use this feature once you reach level 5 of a species.
Once you've analyzed a pets DNA, you (and all other users) will always be able to see exactly what mutations that pet is carrying in it's profile. You can use this feature once you reach level 5 of a species.
Hex codes, how do they work when breeding pets?
Each hex codes is comprised of 6 digits, but is technically broken up into three parts.
The first part is for red, the middle section is for green, and the last part is for blue. That means, if we look at the color white, which has the code FFFFFF, we can think of this as FF – FF – FF, for Red – Green – Blue. Each of the three sections are independent from each other.
These values work similarly to the regular number system, but here we have 16 “numbers” for each part instead of the typical 10 that we are used to. It still begins that 0 is the lowest value, then it goes up to 9, but then we start getting letters, A, B, C, D, E and F.
Thus, the order is 0, 1, 2, 3, 4, 5, 6, 7, 8, 9, A, B, C, D, E, F. Since we have 2 digits for each of the color slots, that means we begin with 00, 01, 02, 03, 04, 05, 06, 07, 08, 09, 0A, 0B, 0C, 0D, 0E, 0F. Then we go to 10, 11, 12, …, 1A, 1B, 1C, 1D, 1E, 1F, then 20, 21, etc in a repeating form until hitting the letters A0, A1, A2, …, AA, AB, AC, AD, AE, AF, then B0, B1, and so on, up until FF. Thus, 00 is the lowest possible value for any slot in the hex code, and FF is the absolute highest possible value for any slot in the hex codes.
Now, when breeding pets together, we can either get the mom’s code, the dad’s code, or more likely, something in between the two of them. Say we have a female pet with the codes 00 – FF – FF (cyan) and breed it with a white male pet, which has the code FF – FF – FF. The first part (the red part) can be any number between 00 and FF, but the green and blue sections will remain FF, since they are the same for both pets. In other words, we will be guaranteed to get a code of the form ## – FF – FF.
I bred my two pets with the same mutation but got another visible mutation!
If you breed with generated pets, spliced pets or project pets, your outcomes will be pretty consistent since each parent will contain two of the same genes. However, when you continue to breed offspring together from all over the place, things get messy. On its own, you can only see the “dominant gene” which shows up on the pet as a visible mutation. However, unknown to you, the pet may also be carrying a second recessive gene.
For example we have is this lupus showing the Water Tail mutation:
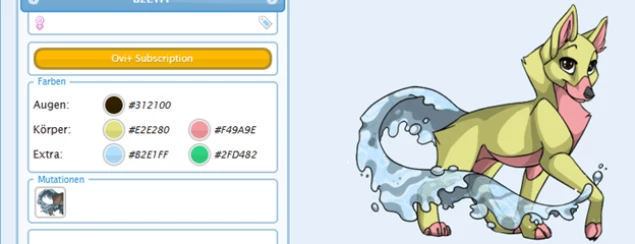
If we check the pedigree, neither parent has any visible tail mutations at all, which makes this female’s tail seem a bit surprising. After checking the grandparents, we can see that both the grandfather on her mother’s side and the grandmother on her father’s side were spliced with the Water Tail mutation:
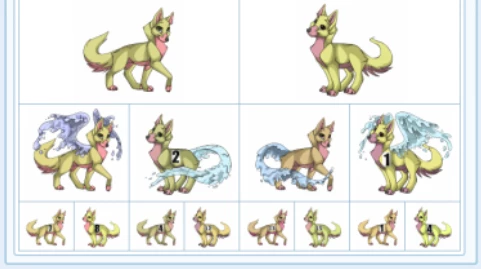
That means that each parent, in the tail slot, contained a Normal Tail gene (which was dominant and showing) and a Water Tail gene (which was recessive and carried hidden). If we create a Punnett square of the two parents, we can list out all possible offspring outcomes as follows:
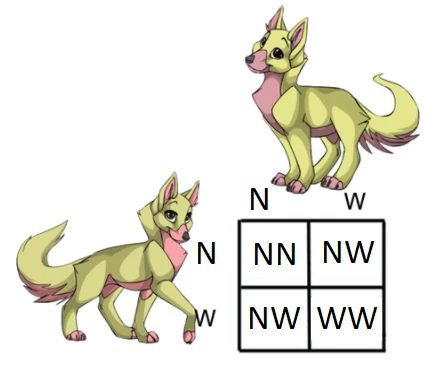
As we can see from the Punnett square, the offspring has a 1 in 4 chance of showing the water tail, a 1 in 4 chance that they have no mutation showing and no gene carried, and a 2 in 4 chance that they end up like her parents, carrying the water tail, but showing the dominant “Normal” gene.
Thus, despite both parents showing no tail mutation whatsoever, because both had water tail hidden as a recessive gene, this female lucked into having WW as her genes, meaning she now shows the water tail. While this example still isn’t so complicated as the grandparents had been spliced, meaning we could easily determine what the parents carried, this gets far more complicated the further down the pedigree we get from pets that were spliced.
To make matters easier, you can use the DNA profile to see all of the carried genes as well of a pet that comes from unknown ancestry. For instance, here is a snake that was DNA profiled.
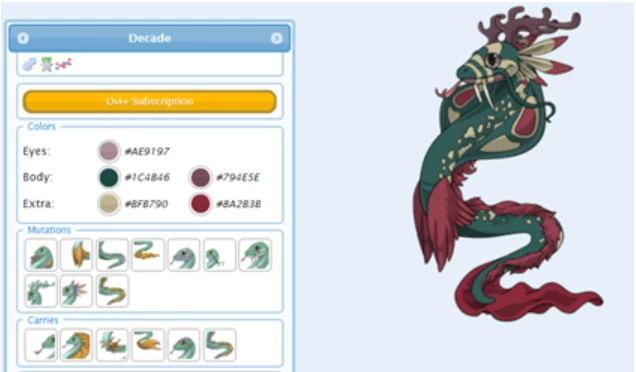
Not only does the snake show the “Wings” mutation that we could easily see, but it also carries the “Star Fin” mutation in the same slot as a recessive gene. That means, if we had bred it to another snake, this male could pass down either mutation to its offspring. If we had not DNA profiled it, we may have been in for a bit of a shock if the offspring suddenly shown the “Star Fin” gene. Especially in the cases of low dominance mutations, a certain gene can be carried hidden for many different generations (even off the pedigree list!) but still randomly pop up one day. So even if you breed two pets that show the same mutation, depending on what recessive genes the parents may carry, the offspring may pop up with something completely different.
Take this girl for instance:
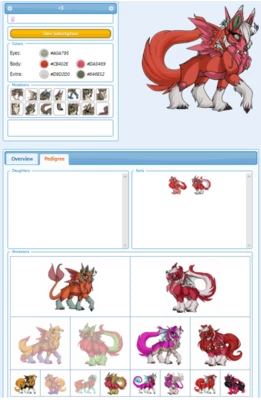
She shows Lynx Eared Husky Head, but if you look at her parents and even grandparents, that mutation is nowhere to be found. However, on mom’s side she has a great grandfather with the Lynx Eared Husky Head, and on the dad’s side she has a great grandmother showing it as well. So the Lynx Eared Husky Head managed to pass down unseen for a few generations before popping up with this offspring. It can be easy for mutations of lower dominance to pass unnoticed for several generations before showing up again much later.
For example we have is this lupus showing the Water Tail mutation:

If we check the pedigree, neither parent has any visible tail mutations at all, which makes this female’s tail seem a bit surprising. After checking the grandparents, we can see that both the grandfather on her mother’s side and the grandmother on her father’s side were spliced with the Water Tail mutation:

That means that each parent, in the tail slot, contained a Normal Tail gene (which was dominant and showing) and a Water Tail gene (which was recessive and carried hidden). If we create a Punnett square of the two parents, we can list out all possible offspring outcomes as follows:

As we can see from the Punnett square, the offspring has a 1 in 4 chance of showing the water tail, a 1 in 4 chance that they have no mutation showing and no gene carried, and a 2 in 4 chance that they end up like her parents, carrying the water tail, but showing the dominant “Normal” gene.
Thus, despite both parents showing no tail mutation whatsoever, because both had water tail hidden as a recessive gene, this female lucked into having WW as her genes, meaning she now shows the water tail. While this example still isn’t so complicated as the grandparents had been spliced, meaning we could easily determine what the parents carried, this gets far more complicated the further down the pedigree we get from pets that were spliced.
To make matters easier, you can use the DNA profile to see all of the carried genes as well of a pet that comes from unknown ancestry. For instance, here is a snake that was DNA profiled.

Not only does the snake show the “Wings” mutation that we could easily see, but it also carries the “Star Fin” mutation in the same slot as a recessive gene. That means, if we had bred it to another snake, this male could pass down either mutation to its offspring. If we had not DNA profiled it, we may have been in for a bit of a shock if the offspring suddenly shown the “Star Fin” gene. Especially in the cases of low dominance mutations, a certain gene can be carried hidden for many different generations (even off the pedigree list!) but still randomly pop up one day. So even if you breed two pets that show the same mutation, depending on what recessive genes the parents may carry, the offspring may pop up with something completely different.
Take this girl for instance:

She shows Lynx Eared Husky Head, but if you look at her parents and even grandparents, that mutation is nowhere to be found. However, on mom’s side she has a great grandfather with the Lynx Eared Husky Head, and on the dad’s side she has a great grandmother showing it as well. So the Lynx Eared Husky Head managed to pass down unseen for a few generations before popping up with this offspring. It can be easy for mutations of lower dominance to pass unnoticed for several generations before showing up again much later.
Multi Splices?
Multi Splices are used to splice a second mutation onto an egg. Do note that you can only use one Multi Splice on an egg, which means you can only add up to two mutations at most on any egg. To use a Multi Splice, you must first splice on one of the mutations. To do so, go to the egg you wish to use it on, click on the lab tab of the egg, splice on the first mutation, and then you should see an option to use the Multi Splice. Once you click to use one up, you will be able to add on a second mutation.
Quick Hatches?
Quick Hatches are used to instantly hatch an egg, no matter what percent of hatching the egg is currently at. To use a quick hatch, go to the egg you wish to hatch, click on the lab tab of the egg, and then use the Quick Hatch.
Sterilization?
To sterilize a pet you click the "Lab" button on your pet's profile page (the page you get to when you click the pet). At the top of the the "Lab" page you will see a "Sterilize" button.
If a pet have been sterilized you'll no longer be able to breed or clone the pet. This option cannot be undone.
If a pet have been sterilized you'll no longer be able to breed or clone the pet. This option cannot be undone.
What happens when breeding pets with mutations of the same dominance?
Let’s say you have two pets with different mutations that both have the exact same dominance. For instance, you could have two lupus projects, one spliced with striped feline head and one spliced with curly eared head.
If we create a Punnett square to predict the possible outcomes, we can clearly see that all offspring will carry both the Striped Feline Head and Curly Eared Head. However, both striped Feline Head and Curly Eared Head genes have the same dominance of 15:


This means that technically, neither is dominant and neither is recessive. So the chance one shows up over the other is a coin flip. There is a 50% chance you’ll show the Striped Feline Head and a 50% chance you’ll show Curly Eared Head. If a pet has genes containing two genes of the same dominance, then either one may show, and the other one will be carried.
If we create a Punnett square to predict the possible outcomes, we can clearly see that all offspring will carry both the Striped Feline Head and Curly Eared Head. However, both striped Feline Head and Curly Eared Head genes have the same dominance of 15:


This means that technically, neither is dominant and neither is recessive. So the chance one shows up over the other is a coin flip. There is a 50% chance you’ll show the Striped Feline Head and a 50% chance you’ll show Curly Eared Head. If a pet has genes containing two genes of the same dominance, then either one may show, and the other one will be carried.
What types of gems are there?
To be awarded a gem the pet must hit the right combination of color codes, the order of colors won't matter to earn the gem.
 Peridot: #32CD32 + #FFF700
 Amethyst: #B57EDC + #8F00FF
 Pearl: #FFFDD0 + #F4C2C2
 Calcite #E5E4E2 + #FFFAFA
 Angelite: #E5E4E2 + #C3CDE6
 Tanzanite: #0F0F0F + #0000CF
 Bloodstone: #A00000 + #003220
 Black Pearl: #080C12 + #1E272C
 Ruby: #FF0800 + #800020 + #960018
 Jade: #004225 + #177245 + #32CD32
 Agate: #D2691E + #FFFDD0 + #964B00
 Aquamarine: #177245 + #00B7EB + #00CED1
 Onyx: #36454F + #321414 + #0F0F0F
 Amber: #FFBF00 + #FFF700 + #FF7518
 Alexandrite: #01796F + #B57EDC + #F64A8A
 Sapphire: #00B7EB + #00008B + #0070FF
 Turquoise: #00CED1 + #00BFFF + #0070FF
 Spinel: #8B0000 + #C71585 + #FF69B4
 Moonstone: #73C2FB + #9BDDFF + #E5E4E2
 Tourmaline: #FF43A4 + #E5E4E2 + #00AD4B
 Malachite: #003220 + #71EEB8 + #2E8B57
 Pink Coral: #F8797D + #FF7F50 + #FC9483
 Kyanite: #589DE6 + #FFFFF0 + #FADFC8
 Hawk's Eye: #080C12 + #D2691E + #589DE6
 Ametrine: #AF81F0 + #FF9912 + #FFDA73
 Sugilite: #DF73FF + #6E0DD0 + #E3AAEE
 Imperial Jasper: #6E0DD0 + #FADFC8 + #76DAFF
 Citrine: #FFCD41 + #FF9912 + #FFFDD0
 Grape Agate: #AF81F0, #D2C3FF, #9BDDFF
 Moss Agate: #F8F8FF, #F0FFF0, #003220
 Hematite: #C4C3D0 + #778899 + #36454F + #0F0F0F
 Opal: #FFFDD0 + #B57EDC + #FFBF00 + #00CED1
 Sheen Obsidian: #DAA520 + #D2B48C + #0C090A + #616D7E
 Rose Quartz: #FB607F + #FFA6C9 + #FFCDE8 + #F4C2C2
 Tigers Eye: #241200 + #502800 + #FFBF00 + #FF9912
 Garnet: #8B0000 + #800020 + #321414 + #0F0F0F
 Fluorite: #A0FFC3 + #17BDE8 + #C71585 + #5A0058
 Labradorite: #0264DB + #1E272C + #84EC9F + #FF9912
 Diaspore : #FFFDD0 #D0F0C0 #FFCBA4 #DE8463
 Bumblebee Jasper: #FFF700 #E5E4E2 #1E272C #FF9912
 Fire Opal: #FF0800 + #0F0F0F + #002FA7 + #36454F + #007FFF
 Euclase: #08457E + #0198E1 + #EEDD82 + #FFBF00 + #FF9912
 Bismuth: #FFF55E + #63F6E2 + #00FFAA + #FF58DC + #A37DEE
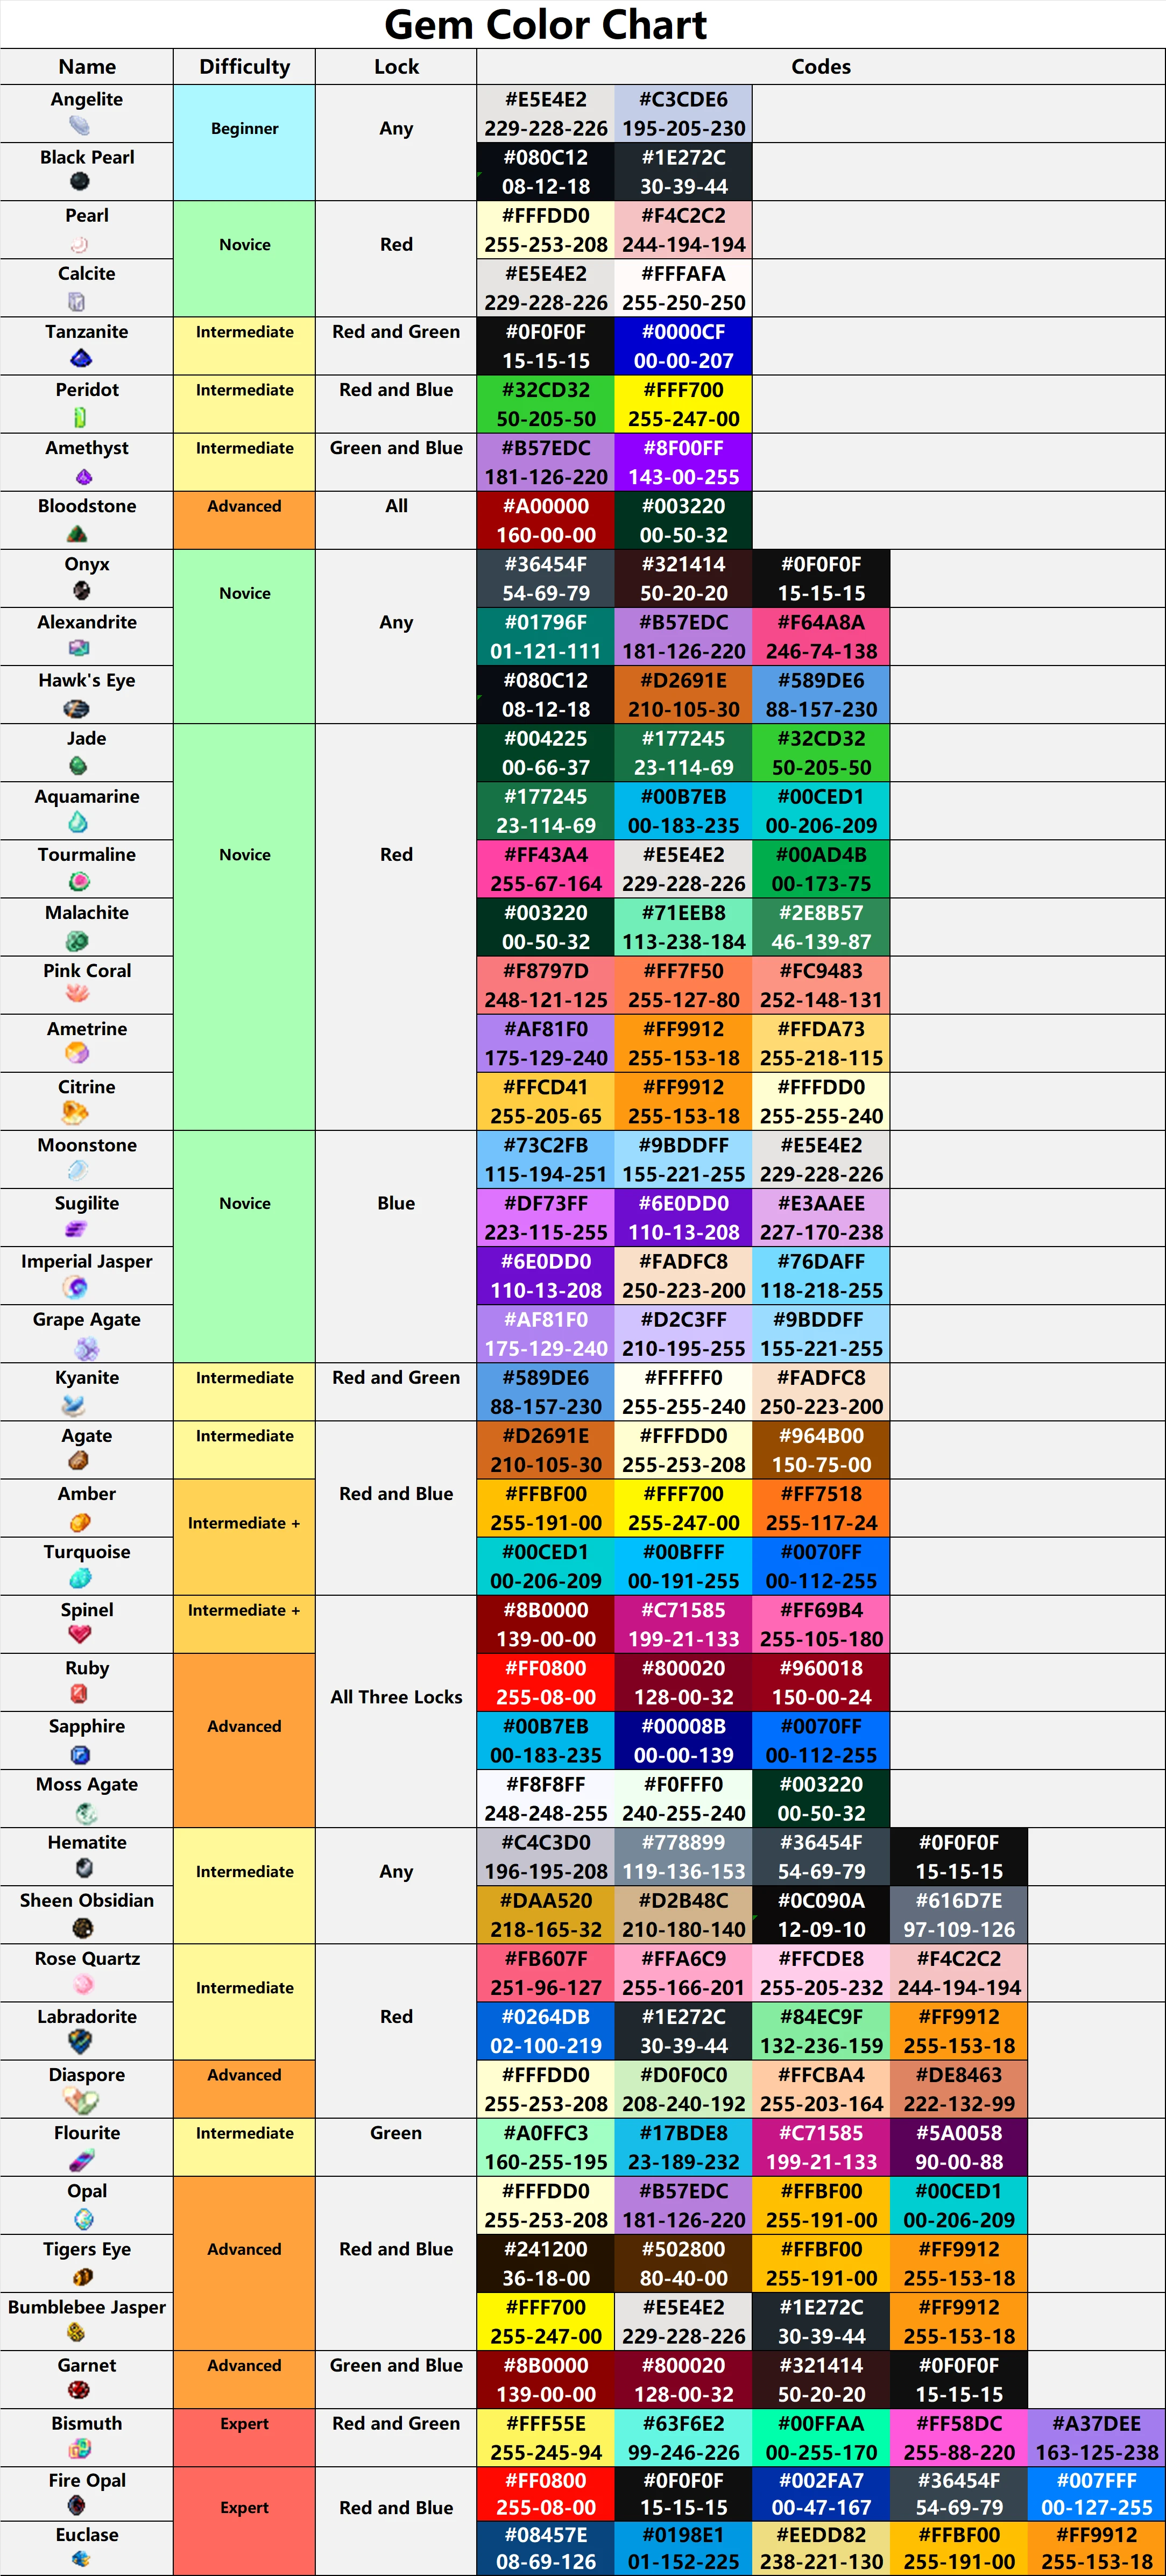
 Peridot: #32CD32 + #FFF700
 Amethyst: #B57EDC + #8F00FF
 Pearl: #FFFDD0 + #F4C2C2
 Calcite #E5E4E2 + #FFFAFA
 Ruby: #FF0800 + #800020 + #960018
 Jade: #004225 + #177245 + #32CD32
 Agate: #D2691E + #FFFDD0 + #964B00
 Aquamarine: #177245 + #00B7EB + #00CED1
 Onyx: #36454F + #321414 + #0F0F0F
 Amber: #FFBF00 + #FFF700 + #FF7518
 Alexandrite: #01796F + #B57EDC + #F64A8A
  Sapphire: #00B7EB + #00008B + #0070FF
 Turquoise: #00CED1 + #00BFFF + #0070FF
 Spinel: #8B0000 + #C71585 + #FF69B4
 Hematite: #C4C3D0 + #778899 + #36454F + #0F0F0F
 Opal: #FFFDD0 + #B57EDC + #FFBF00 + #00CED1
  Sheen Obsidian: #DAA520 + #D2B48C + #0C090A + #616D7E
 Fire Opal: #FF0800 + #0F0F0F + #002FA7 + #36454F + #007FFF
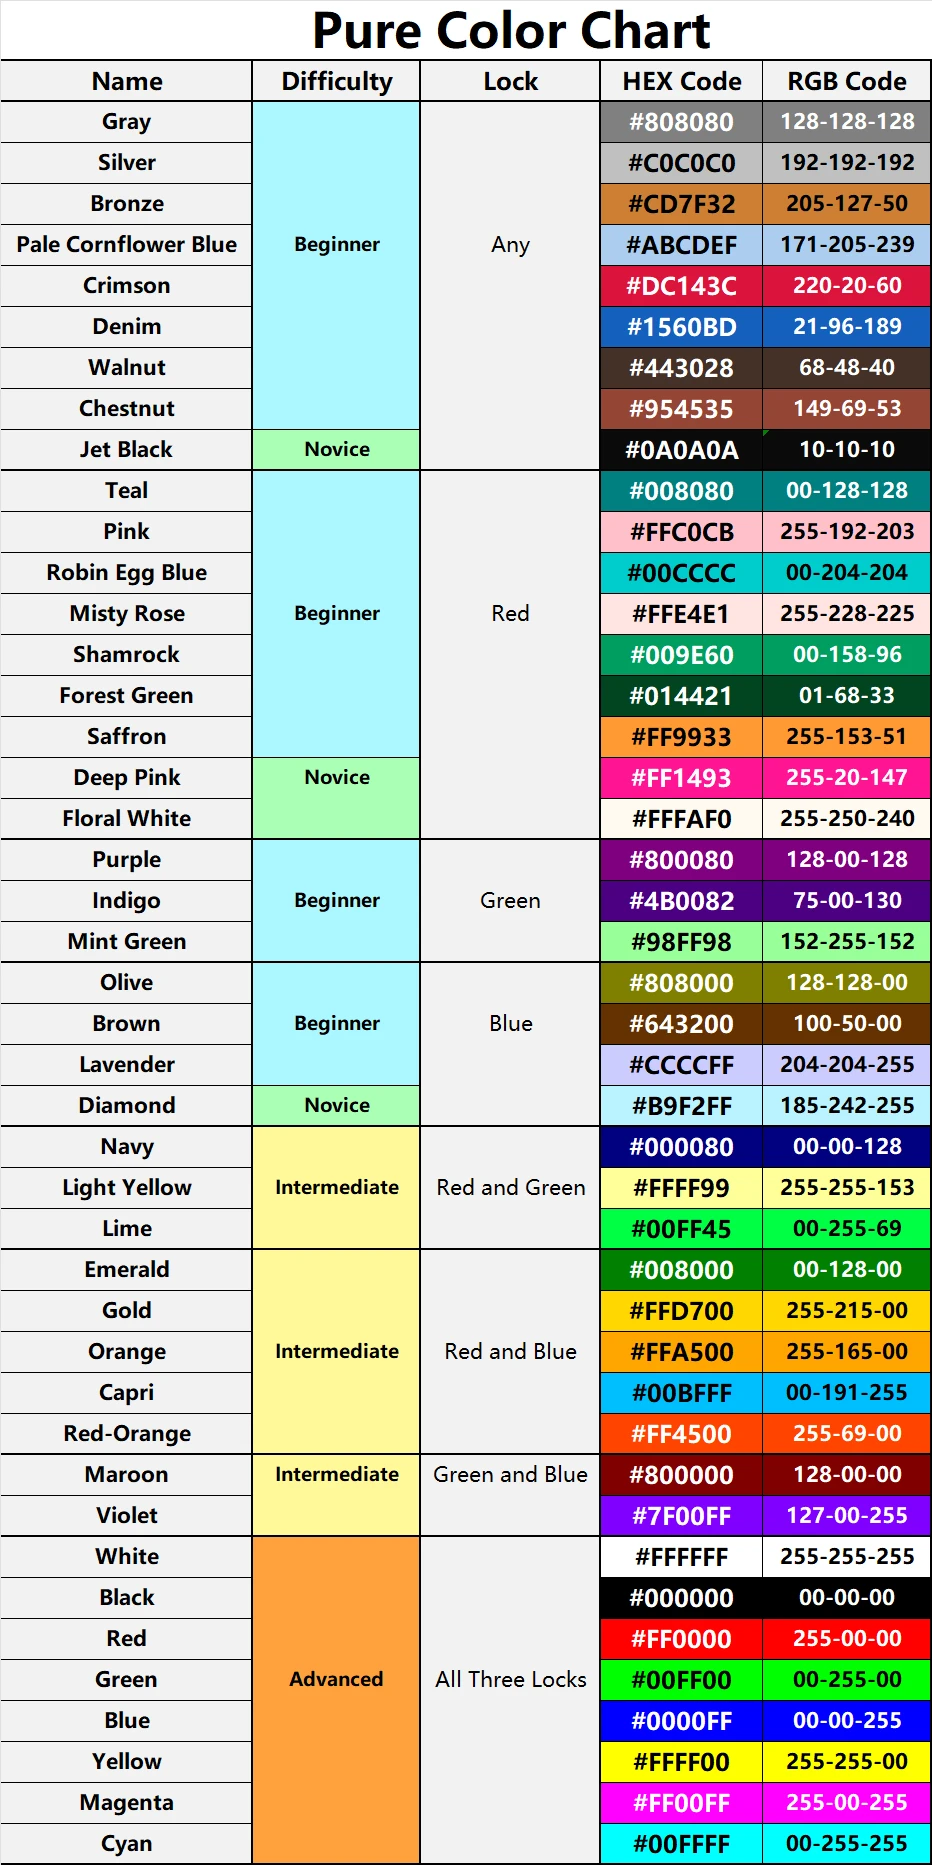
What types of pure colors are there?
The following colors are considered pure and therefor recognized with a pure dot in the presentation.
 Pure White: #FFFFFF
 Pure Black: #000000
 Pure Red: #FF0000
 Pure Green: #00FF00
 Pure Blue: #0000FF
 Pure Yellow: #FFFF00
 Pure Magenta: #FF00FF
 Pure Cyan: #00FFFF
 Pure Gray: #808080
 Pure Maroon: #800000
 Pure Emerald: #008000
 Pure Navy: #000080
 Pure Teal: #008080
 Pure Purple: #800080
 Pure Olive: #808000
 Pure Diamond: #B9F2FF
 Pure Gold: #FFD700
 Pure Silver: #C0C0C0
 Pure Bronze: #CD7F32
 Pure Orange: #FFA500
 Pure Pink: #FFC0CB
 Pure Brown: #643200
 Pure Robin Egg Blue: #00CCCC
 Pure Pale Cornflower Blue: #ABCDEF
 Pure Indigo: #4B0082
 Pure Mint Green: #98FF98
 Pure Deep Pink: #FF1493
 Pure Lavender: #CCCCFF
 Pure Floral White: #FFFAF0
 Pure Misty Rose: #FFE4E1
 Pure Shamrock: #009E60
 Pure Violet: #7F00FF
 Pure Light Yellow: #FFFF99
 Pure Capri: #00BFFF
 Pure Lime: #00FF45
 Pure Red-Orange #FF4500
 Pure Crimson #DC143C
 Pure Denim #1560BD
 Pure Jet Black #0A0A0A
 Pure Forest Green #014421
 Pure Deep Saffron #FF9933
 Pure Walnut #443028
 Pure Chestnut #954535

Why can’t I breed two of my pets together?
Check if the female is on cool down after a breeding, as females have to wait a number of hours between breedings. How many hours depends on the species in question. You can find out the exact cooldown hours at the Lab page.
If your female is not on cooldown, then the two pets are related. If two pets have a common ancestor anywhere in the visible pedigree, the two pets will not be able to breed.
If your female is not on cooldown, then the two pets are related. If two pets have a common ancestor anywhere in the visible pedigree, the two pets will not be able to breed.
Adding images and other formatting to comments?
To add an image to your comment, simply write the image URL. This can be obtained by right clicking the image, choose "Copy image location" and then just paste it in your comment. OviPets will automatically detect that it's an image and display it when posted. The same happens when you post links and they're made clickable automatically. Paid users can also upload an image to their comments as well.
You can format your text using standard forum codes. Just surround the text you want to style with the tag for that code below, just remove the plus signs:
[u+]Your text here will be underlined[/u+]
[b+]Your text here will be bold[/b+]
[i+]Your text here will be italic[/i+]
[c+]Your text here will be centered[/c+]
[s+]Your text here will be strike through[/s+]
[+clr#FF0000]Your text here will colored[/clr+]
[h1+]
[h2+]
[h3+]
To post a video, you can do so using
[+vid][/vid]
You can format your text using standard forum codes. Just surround the text you want to style with the tag for that code below, just remove the plus signs:
[u+]Your text here will be underlined[/u+]
[b+]Your text here will be bold[/b+]
[i+]Your text here will be italic[/i+]
[c+]Your text here will be centered[/c+]
[+clr#FF0000]Your text here will colored[/clr+]
[h1+]
Your text here will be the largest header
[/h1+][h2+]
Your text here will be the second largest header
[/h2+][h3+]
Your text here will be the smallest header
[/h3+]To post a video, you can do so using
[+vid][/vid]
Notifications, how do I turn them off?
Simply click "Show all notifications" in the notifications dropdown (the big number in a box next to the quick search bar at the top) and there in that list you can click the big X button to turn off notifications for that post.
However, if you post in the thread or like it again, the notifications will be turned back on.
However, if you post in the thread or like it again, the notifications will be turned back on.
Why aren't images showing in comments?
If you're using a secure connection (your address in the address bar starts with https://) you will only be able to see images that are linked with a https:// connection. If you're using normal http:// you'll be able to see all images.
If you're posting external images (not from OviPets) you should try to post from a https:// URL to ensure everyone can see them without problems. If not, users on a secure connection will only see a link, not the image.
Note: OviPets images are automatically converted.
If you're posting external images (not from OviPets) you should try to post from a https:// URL to ensure everyone can see them without problems. If not, users on a secure connection will only see a link, not the image.
Note: OviPets images are automatically converted.
Am I a paid user?
If you've ever at some point during your time here at OviPets bought credits or an Ovi+ subscription, or had someone use a paid token on you, then yes, you're a paid user. Once you are a paid user, it is permanent, even if you spend all the credits or run out of Ovi+.
All paid users have either a coin next to their name on their profile page , or, if they have also reserved their name, they will have a yellow asterisk
  .
.
You do not need to have an active Ovi+ subscription to be a paid member.
All paid users have either a coin next to their name on their profile page
You do not need to have an active Ovi+ subscription to be a paid member.
Can I receive credits from a trade as an unpaid user?
Yes, all users can receive credits.
However, unpaid members cannot send credits to others, purchase pets, or use the auction house.
However, unpaid members cannot send credits to others, purchase pets, or use the auction house.
Can’t send credits, why does it say I have to be a paid user to do that?
Only users who have made a purchase through the game at some point can send credits to other users. This block was put in place to prevent people from creating multiple accounts and transferring the start-up credits from those accounts to their main account, and thereby getting access to unlimited amounts of credits.
How do I become a paid user?
It's quite easy! You just purchase any amount of credits, bundle or Ovi+ subscription one time - and you're a paid user for life. You can also become a paid member if a user with an extra paid token uses it on you.
You purchase credits from your Trade page, at the bottom you'll find buttons with "Get More Credits", "Ovi+ Subscriptions" and occasionally a "Bundles" option as well. Press the option you're interested in, choose the button on the next page with the choice you wish to purchase, click it and follow the instructions from Facebook based on your payment option.
Note that while purchasing an Ovi+ subscription does make you a paid member, it is not the only option. Any purchase will make you a paid member, and while an Ovi+ subscription is temporary, once you become a paid member, that is permanent.
How do I get more credits?
You can buy them from the bottom of your Trade page, sell pets or breedings for credits to other users, or, if you’re lucky, find them by turning your friend’s eggs for them. Turning your own eggs will not generate credits.
On the Challenges page, you can also participate in different events on the to get a chance at winning credits and other prizes, and there you will also see the login bonus. You can read more about that in the login bonus section of the FAQ.
On the Challenges page, you can also participate in different events on the to get a chance at winning credits and other prizes, and there you will also see the login bonus. You can read more about that in the login bonus section of the FAQ.
What is a "login bonus" and how do I get it?
If you are active every day (not letting more then 30 hours pass between each OviPets session) for a week you will be able to claim a small bonus at the end of the week. It's random how much you get, but you can get between 5-15 credits. You claim your bonus and can also see your progress from the Challenges page.
What is a Paid Token and how do I use it?
Paid tokens can be purchased by going to your Trade tab and clicking on the bundles option. There is the option for a Sponsor Bundle if you are just looking to purchase a paid token to make a friend paid, or they also come along as a small extra gift in some of our other bundles as well.
Once you are in possession of a paid token, you can use it on any of your unpaid friends. You must first be friends with the user you wish to make paid. Once you are friends with them, on their profile, you can click the "Edit Friendship" and click the "Sponsor" button to make them paid. They will then receive all of the perks of being paid.
At this point in time, paid tokens cannot be transferred between accounts. They can only be used by an account that purchased the token to an unpaid account directly.
Why am I having trouble buying credits?
Unfortunately there are times that when you attempt to buy credits you will get an error that won't allow you to finalize your purchase and process it. This will end up preventing you from completing your credit purchase.
Try the following if you are having trouble completing your purchase:
Trying to buy credits on your mobile phone?
Change the "www" part to "m" on facebook.com after clicking the credit amount you want to buy. You can also try to sign directly into the website ovipets.com to complete the purchase from there.
Trying to buy credits on the Firefox browser?
Try logging into canvas mode and signing into Ovipets to complete your purchase.
If you are still having issues try contacting our support e-mail at:
support@ovipets.com
Make sure to include any screenshots and information you can to help us try to resolve the issue as quickly as possible.
Why become a paid user?
There are many benefits to becoming a paid user that reach beyond just the items you choose to purchase. On top of now having the credits (or other items) you bought, you will also have the ability to send credits to other users, buy pets, use the auction house, create groups and project registries, reserve your name so only you can use it, and mass feed your pets. You will also be able to research any species to level 5, which gives you access to limited and exclusive mutations and bonuses such as DNA profiling, cloning etc.
Additionally, the game becomes ad-free, and when it comes to new releases, you can get access to some of our new species before unpaid users. Other perks might be added in the future. :)
Additionally, the game becomes ad-free, and when it comes to new releases, you can get access to some of our new species before unpaid users. Other perks might be added in the future. :)
Why do some hatcheries seem to give no credits?
The average credit rate is about 1 credit in 15 to 20 eggs, but there is randomness to it, so at times it may seem higher or lower. However, if you notice yourself turning hundreds of eggs in a hatchery and receiving no credits, it is likely an account flagged for credit farming, and we suggest you find other hatcheries to turn for instead.
Credit farming is when an account is used mainly to store massive amounts of eggs for another account (or accounts) to gain credits from, and is relatively inactive otherwise. Accounts that are used primarily for the benefit of another "main" account are against the terms of service, even if technically there is another person that owns the account.
There are multiple aspects that go in to determining whether or not an account is flagged for being a credit farm. To prevent users from being able to find loopholes to continue cheating, we will not be providing the specifics. However, it is highly unlikely for a regular player's hatchery to be flagged.
On very rare occasions, a newer account may be flagged as a credit farm and the hatchery may produce no credits for egg turners. While this can be inconvenient, this is not an issue that tends to last long, as continuing to play actively will have things return to normal.
Credit farming only affects the hatcheries of the users trying to produce credits for another account, it does not affect an egg turner. So if you find yourself turning a hatchery and not getting any credits from it, you do not have to worry about your account being affected by this.
Why get Ovi+?
Ovi+ subscriptions can be purchased from the Trading tab in increments of 1 month, 3 months and 12 months. Ovi+ will make you a paid user after a single purchase, and you will remain a paid user even after your subscription ends. On top of that, there are many additional benefits that are exclusive to only Ovi+ members.
Ovi+ will keep all of your pets fully fed for the entire time your subscription lasts. On top of that, it will cut all of your research, breeding, cooldown and hatching times in half. You will have immediate access to every single species (so you don't have to own them in order to begin researching). During the time of your subscription, you will also be able to resurrect any dead pets for free.
Ovi+ will keep all of your pets fully fed for the entire time your subscription lasts. On top of that, it will cut all of your research, breeding, cooldown and hatching times in half. You will have immediate access to every single species (so you don't have to own them in order to begin researching). During the time of your subscription, you will also be able to resurrect any dead pets for free.
How do I generate a pet?
You can generate your own pets by going to the Lab page, and clicking on the "Generate" button under the species you wish to create. Some species are seasonal species and are only available to generate around certain times of the year. You must research a species to Level 1 in order to be able to generate them.
Different species may have different costs. The cost per species can be found in the top right. Keep in mind that researched a species to at least Level 2 will decrease the cost of generating a pet slightly.
From this page, you can select your colors for each of the color slots by either typing in the exact hex code you want to aim for, or by playing around with the color picker. You can also click the "Re-Roll" button towards the bottom to randomly change the colors shown if you want to get some new ideas.
You can also pick how many pets you want to generate at once, the gender you want the pet(s) to be, and what lock color you'd like to use (for more information, check out the section of the FAQ that goes over lock colors).
Once you have decided, you can hit the "Generate" button and see what pops out!
What do the locks do?
Choosing red, green or blue locks hold the exact input plugged into the generator for that specific slot. You can only use one lock at a time.
For instance, if you choose to generate a pet with the following color inputs and a blue lock:
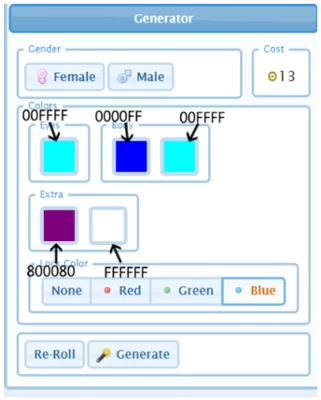
Then you might get a pet with codes like this one:
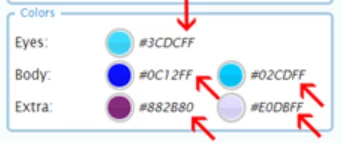
As you can see, the blue part of the hex code (the last two digits of each code) is "fixed" in that it has given the exact values plugged into the generator. The other two sections of the code (red and green slots), however, have some randomness to them as they aren't locked. If you are unsure about hex codes work, you can check out the FAQ on hex codes.
Here is a potential example of a green locked using the same colors (the middle two digits are fixed):
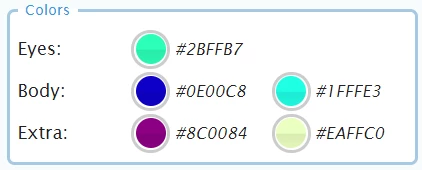
And a red lock (first two digits are fixed):
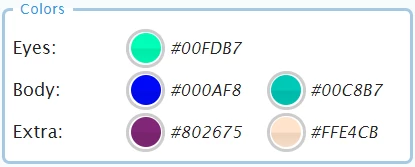
The generator automatically pre-selects the option "none", which means that your pet will not use any lock, and all parts of the code will be slightly randomized. This would give you a results such as the one below:
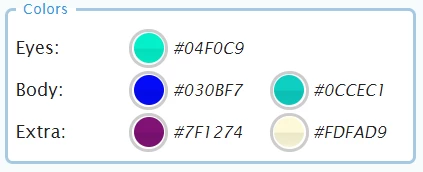
For instance, if you choose to generate a pet with the following color inputs and a blue lock:

Then you might get a pet with codes like this one:

As you can see, the blue part of the hex code (the last two digits of each code) is "fixed" in that it has given the exact values plugged into the generator. The other two sections of the code (red and green slots), however, have some randomness to them as they aren't locked. If you are unsure about hex codes work, you can check out the FAQ on hex codes.
Here is a potential example of a green locked using the same colors (the middle two digits are fixed):

And a red lock (first two digits are fixed):

The generator automatically pre-selects the option "none", which means that your pet will not use any lock, and all parts of the code will be slightly randomized. This would give you a results such as the one below:

Why doesn't the generator give me the colors I choose?
The generator does have a certain random element to it, so that it's not possible to just generate the perfect pet in a click. If you could do that, OviPets would quickly lose its purpose as a breeding game. You're meant to have to breed to get the perfect pet and colors. You can however improve generator accuracy a bit by leveling up a species in the Lab.
How do I create my own group?
If you wish to make your own group, you have to be a paid player (if you're unsure if you are, check that section in the FAQ). Groups have a small start fee but are after that free to run and you start them from your profile page. However please be aware that as the owner of the group, you alone are responsible for all the content posted in there, so be sure you have time to actively moderate the groups you create.
You just click the "Create Group" button in the "Group" section of your Feed.
Be careful with what you name your group as the name can't be changed after creation.
You just click the "Create Group" button in the "Group" section of your Feed.
Be careful with what you name your group as the name can't be changed after creation.
How do I edit settings or add a forum to my group?
If you go to your group page, you will see a cog icon at the top. Press it to and then click the desired tab to get to the right section. For example, go to "Forum" and then click the "Add Forum" button to add a forum to your group.
How do I find a group to join?
You can either join groups your friends have already joined by simply going to their feed page and click on the little icons for groups in the top right hand corner. From there you can click the "Join Group" button if it's an open group or send a request to join if the group is closed.
Otherwise you can use the Search and search for groups in the areas you're interested, for example, if you're looking for fellow Draconis breeders, you'd do a group search for the keyword "draconis". Then a list of groups will appear and you can choose to join the ones which sounds most exciting to you.
There is also a "Group Ads" news post, which can be found by using the "News" sort button at the top of your feed, and then scrolling through the different Ovipets news posts until you find it. Many users post group recommendations on there, so you might find one there that interests you!
How can I contact Ovipets Support?
For Technical, Payment, or ToS violations please contact us on our support email:
support@ovipets.com
Be sure to include your user id (#).
For Suggestions please send an email to:
suggestions@ovipets.com
Please know that while all will be read, we unfortunately don't have the manpower to reply to each suggestion email.
For other matters you're most welcome to contact us by using the following information:
Company Address
IO HAZE PTE. LTD.
16 RAFFLES QUAY
#33-03 HONG LEONG BUILDING
SINGAPORE (048581)
How do I add pets to a project?
Note, in order for pets to be added to a project registry, you must first publish the registry! Pets cannot be added to an unpublished registry. For information on how to do that, check the FAQ for how to register a project.
Once a project registry has been published, you can add "Origin Pets". Origin pets are the base of the project, and any future descendants where both parents are part of the same project registry will automatically become part of the project and therefore have the project rules enforced. Cloning a project pet will make the clone part of the project.
The only pets eligible as origin pets are pets that were born on the project owner's or collaborators' accounts and have no close ancestors that are part of another project.
Adding an origin pet is done from the edit tab on the pets profile page. From there, you can the "Add to Project" button for any eligible pet. Each origin pet added costs 10c.
You can retroactively add pets for free if you own it and both parents are part of the project. Clicking the "Retroactive Add" button on the project page will show all eligible pets you own. You then simply click on the pets you want to add.
How do I register a project?
After you click on the Projects tab, you can create your own project registry by clicking on the "Register Project" button at the top right of the page.
From there, you can type in your desired name, and click to register your project. Each registry must have a unique name. If the name you pick is unique, you will have a confirmation box pop up stating the cost of 100 credits and that the name is permanent and cannot be changed after confirming.
After you click "Ok", you will be presented with a blank registry to set up.
Important!
Do NOT click on the publish button until you are certain your rules are set up the way you want it. After you publish, you will only be able to make your rules less restrictive, never to make it more restrictive, so be careful with how you set it up initially.
On this blank registry page, you can add a presentation to include any information or banners you would like. You can also click on the "Edit Rules" button to set up the different restrictions you would like to include. Check out the FAQ on Project Rules to learn more about the different options.
Once you have decided the rules you'd like to include, then you can click the "Publish" button. Congrats, you've registered your project!
After it's been published, you can add pets to the project and select poster pets, or even add collaborators. For more information, check out the FAQ on adding pets to a project.
What are collaborators?
Collaborators is a way to add more people to manage a project.
Just like with the project owner, the projects rules don't apply to collaborators and it also makes it possible to add origin pets that were born on the collaborators account.
Collaborators cannot add or remove pets from the project registry, nor can they change any of the rules of the project.
To add a collaborator, go to your registry, hit the button towards the bottom left that says collaborators. From there, type in the name of a friend that you wish to add as a collaborator. This person must be on your friends list in order to add them, and you will type their name and then select them when they pop up.
What is the purpose of projects?
This feature has been created to help project owners protect and promote their projects. There is a project directory page where all projects are listed. You can find a link to the project directory in the navigation bar and from there you can also register new projects. ( https://ovipets.com/#!/?src=projects&sub=directory )
When you register a project, you'll have to decide the name and rules of the project. These can not be changed later, so choose carefully.
Registered projects use "reserved" names, meaning the name will be visible in the url and no user or group can be named the same.
A newly registered project will be in "draft mode". While in draft mode you can edit the rules as much as you want. You cannot add pets to a project while in draft mode. You'll be able to choose your origin pets and add retroactive pets only once it's been published. The project will only be listed in the project directory once it's been published, with the exception of your own under the "mine" filter.
What project rules are there?
Once a project has been published, it's only possible to update the rules to be less restrictive, so please choose them carefully. Rules only apply to pets that are part of the project.
The rules you can choose from are the following:
Inherit Tattoos - This will make any offspring inherit the tattoos of their parents if possible. Tattoos can only be inherited if the offspring have the same mutation as the tattooed one of the parent of the same gender. This rule can be toggled on or off at any time.
Auto Lock Offspring - New pets will automatically be locked and the lock is held by the project owner. The presentation of locked project pets will no longer be locked due to them getting an additional project presentation, which can only be altered from the project's page. This is mainly useful in combination with "Inherit Tattoos" to make sure the tattoos aren't altered. It will also lock the name of the pet so any new owners will be unable to rename the pet.
Only Breed Within Project - Project pets can only breed with pets that belongs to the same project. Note that if you are not selling breeding pairs, this effectively sterilizes the registered pets.
No Breed Requests - Project pets can not be part of a breed request. No Breed Requests means pets cannot be set up for trade breed nor can an egg be sent to someone via a breed trade. This does not prevent the ability to breed it to another pet that is set up for public breeding. Note: selecting this option does not prevent users from putting pets up for auto paid or even free breeding, you can use this option and still adjust the breeding fees.
Set Breeding Fee - The set breeding fee must be between the minimum and maximum values.
No Public Breeding Allowed - Prevents any type of auto breeding. Note: selecting this option does not prevent users from putting pets up for trade breeding. If you want to prevent all types of public breeding, you will need to select this option and the "No Breed Requests"
No Trade Requests - Project pets can not be part of a trade request. If chosen, the registry’s pets will not show up in the Trading Tab when setting up a trade with another player. Note: selecting this option does not prevent users from putting pets up for sale or even adoption, you can use this option and still adjust the trading price.
Set Trading Price - The set trading price must be between the minimum and maximum values. Note that this price restriction does not affect the pricing of pets sold in the auction house.
No Public Trading Allowed - Prevents any type of auto buy for the pets. Note: selecting this option does not prevent users from putting pets up for trade. If you want to prevent all types of trading, you will need to select this option and the "No Trade Requests"
No Adoption Center - Project pets can not be sent to the adoption center. Keep in mind this only applies to having the pets being sent to the adoption center, it does not prevent users from putting them up for adoption in their own tabs. That is controlled by the pricing restrictions.
No Cloning - Project pets can not be cloned.
No Auctions - Project pets can not be auctioned. It is important to remember that setting the above price restrictions for trading in no way affects the price that pets can be listed for in the auction house. There is no way to control auction house pricing once a pet leaves your ownership if you allow auctions.
With the exception of "Inherit Tattoos" and "Auto Lock Offspring", these rules do not apply to the project owner or collaborators.
Referral links & bonuses
Referral links are links to OviPets which include a little bit of information telling us that you where the one who spread the link around. You can find yours in your Profile under "Referrals". As a thank you for helping to spread the word, when you use your referral link you get 5 credits for each user who registers with Ovipets, and then an additional 100 credits whenever someone who signs up for OviPets using your link purchases their first credits.
All users you've referred will show up in your Referral page, even if they haven't become paid users. If they ever do become a paid user, you will get your second referral bonus and that will show up in your transaction history on your trade page.
If you post about your pets on Facebook using the Facebook share button in their presentations, those links are also automatic referral links so they're an easy way to spread the word to your friends.
You can also directly invite your Facebook friends to join OviPets. Just use the "Invite Facebook Friends" button next to your "View all Friends" button in your feed.
How do I bid on an auction?
When you find an auction that you like, simply click the Bid button to the right, under the listed bid amounts. The dialogue box that comes up is automatically populated with the minimum amount that you can bid. You can also place a higher (maximum) bid here, and the system will bid for you until someone out bids your maximum bid.
Enter the amount that you want to bid on the auction and click "Okay". If yours is the first bid, you'll see your name under the starting bid amount and your "Max Bid" below that.
Some auctions will also allow you to automatically "Buy" an auction for the price listed on the button. If you click this, you will automatically win the pets, regardless of how long of a time was left on the auction.
Only paid users can bid on or buy auctions.
I bid on an auction and the bid increased, but the other user is still the high bidder. Why?
The auction house has an automated bidding system. This means you can enter the amount that you are willing to pay for an auction lot and the system will bid for you until it reaches your max bid. (Please note that this amount is not necessarily what you will pay if you win. If no one bids against you, you may pay much lower than your max bid.)
If you bid on an auction and the high bid increases, but the other user is still the high bidder, it means that their max bid was more than yours. You can either try to bid again if you really want to win or walk away at this point.
If you bid on an auction and the high bid increases, but the other user is still the high bidder, it means that their max bid was more than yours. You can either try to bid again if you really want to win or walk away at this point.
What is the "Buy" button and when is it available?
Auction creators have the option to set a buyout price for an auction. This will give the you the option to buy the auction lot for the specified price as long as no one have started to bid on the auction.
This can be a good option if you find an auction you really want to win but don't want to risk getting in to a bidding war with other users, which could cause the winning bit to be higher.
This can be a good option if you find an auction you really want to win but don't want to risk getting in to a bidding war with other users, which could cause the winning bit to be higher.
Are Third Party Programs Allowed?
We do not advise downloading any app without Ovi posting in the news about it to confirm if it was something we launched and deem "safe." When you download links you are doing so at your own risk.
Third party applications that give you a game breaking advantage are not allowed. This is considered subject to cheating which is a bannable offense.
Example: Infinite multi splices
Third party applications that give you a game breaking advantage are not allowed. This is considered subject to cheating which is a bannable offense.
Example: Infinite multi splices
How do I become a translator?
If you are interested in becoming a translator please first familiarize yourself with the different topics on translations found in this FAQ.
If you feel like you will be able to understand the system including handling variables and conditional translations you can contact support@ovipets.com to apply.
Please note that due to the complexity of the translation system you should ideally be over the age of 18 and a native speaker of the language to be accepted.
How do I suggest translations?
If you are using OviPets in a language other than English and there are parts that haven't been translated yet, you'll get a notice in your notifications that you can click on in order to add a suggestion.
Clicking the "Suggest Translation" text shows a popup with random texts available for translation suggestions. It also displays the amount of Credits you would earn should your suggestion get used.
If enough users suggests the exact same translation it will be automatically added. Only paid users can suggest translations and translators are able to manually approve suggestions.
Please note that intentionally suggesting inaccurate translations is a suspendible offense.

Clicking the "Suggest Translation" text shows a popup with random texts available for translation suggestions. It also displays the amount of Credits you would earn should your suggestion get used.

If enough users suggests the exact same translation it will be automatically added. Only paid users can suggest translations and translators are able to manually approve suggestions.
Please note that intentionally suggesting inaccurate translations is a suspendible offense.
How do I translate?
From the translators interface you'll get an overview of the current translation progress of your language. There you'll also see tabs for "Untranslated", "Modified" and "Translated" text strings.
The "Untranslated" tab holds the text strings that are yet to be translated while the "Translated" tab holds the ones that are done. If we (the admins) make any changes to a text string, it will show up as "Modified" in the interface. Usually you'll just need to click "Ok" for it to be classified as "Translated" again, but if you need to change anything you can also do that.
You also have a "Log" tab that shows the last changes made to the translation and which user that made them.
If you are a translator and are using OviPets in your language you'll get notifications whenever there are untranslated or modified text strings available:
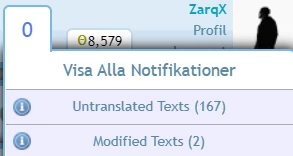
Translations on OviPets is made by simply replacing English text strings with translated texts.
Please note the comments on some of the text strings as they explain what they are or how they are used.
It doesn't have to be a literal translation
Try to translate so that it looks good and makes sense, in many cases word-by-word translations will just look weird on buttons and such so keep an eye on the pages to see the results.
Please take note of how the original text string looks with capitalized letters, punctuation etc. and try to mimic it as much as possible.

The "Untranslated" tab holds the text strings that are yet to be translated while the "Translated" tab holds the ones that are done. If we (the admins) make any changes to a text string, it will show up as "Modified" in the interface. Usually you'll just need to click "Ok" for it to be classified as "Translated" again, but if you need to change anything you can also do that.
You also have a "Log" tab that shows the last changes made to the translation and which user that made them.
If you are a translator and are using OviPets in your language you'll get notifications whenever there are untranslated or modified text strings available:

Translations on OviPets is made by simply replacing English text strings with translated texts.
Please note the comments on some of the text strings as they explain what they are or how they are used.

It doesn't have to be a literal translation
Try to translate so that it looks good and makes sense, in many cases word-by-word translations will just look weird on buttons and such so keep an eye on the pages to see the results.
Please take note of how the original text string looks with capitalized letters, punctuation etc. and try to mimic it as much as possible.
What are "%s" variables in translations?
From time to time you'll see text strings with "%s" in them, this is a variable. These are parts that will be replaced with for example a user or a pet name.
If you for example have the string to translate:
"%s created a clone of %s"
You'll need to include the variables in your translation so that the system knows where to put the names:
"%s skapade en klon av %s"
They can also be used to include numbers like with time translations:

A translated text must have the exact number of variables as the original text to be valid.
If you for example have the string to translate:
"%s created a clone of %s"
You'll need to include the variables in your translation so that the system knows where to put the names:
"%s skapade en klon av %s"
They can also be used to include numbers like with time translations:

A translated text must have the exact number of variables as the original text to be valid.
What are translation conditions?
In some languages you might need different translations depending on the gender of a user, value of number etc. This can be achieved by adding conditions.
Adding a condition
If a text string has a "%s" variable you can add a condition, this is done by clicking the "Add Condition" button under the text area.
s1 refers to the first "%s" variable, s2 the second one and so on. These can be used to check the type of the variable, if for example the inserted variable is a group, pet or a username. And they can also check if a user or pet is a certain gender or if a number has a certain value.
Once a condition has been added you'll be given a separate text area where you can write the translation for that specific condition.
In this example we have the original text "%s commented on their post" which is a notification for when a user have made a new comment on her/his/their post. There are two alternative translations for the same notifications depending on the users gender and it defaults to a gender neutral translation if the gender isn't specified.
If you choose more then one rule in the popup all of them must be true for the condition to be used. You can add more conditions by clicking the "Add Condition" button again and you can easily remove a condition by clicking "Remove" right above the text area.
Another example
An example from the Portuguese translation:
We have the text string:
"%s adopted a pet from %s"
Since you write this sentence different depending on the gender of the users the following conditions are in place:
If s1 is user and female and s2 is user and female:
"A %s adoptou um animal da %s"
If s1 is user and female and s2 is user and male:
"A %s adoptou um animal do %s"
If s1 is user and male and s2 is user and female:
"O %s adoptou um animal da %s"
If s1 is user and male and s2 is user and male:
"O %s adoptou um animal do %s"
Adding a condition
If a text string has a "%s" variable you can add a condition, this is done by clicking the "Add Condition" button under the text area.
s1 refers to the first "%s" variable, s2 the second one and so on. These can be used to check the type of the variable, if for example the inserted variable is a group, pet or a username. And they can also check if a user or pet is a certain gender or if a number has a certain value.
Once a condition has been added you'll be given a separate text area where you can write the translation for that specific condition.
In this example we have the original text "%s commented on their post" which is a notification for when a user have made a new comment on her/his/their post. There are two alternative translations for the same notifications depending on the users gender and it defaults to a gender neutral translation if the gender isn't specified.

If you choose more then one rule in the popup all of them must be true for the condition to be used. You can add more conditions by clicking the "Add Condition" button again and you can easily remove a condition by clicking "Remove" right above the text area.
Another example
An example from the Portuguese translation:
We have the text string:
"%s adopted a pet from %s"
Since you write this sentence different depending on the gender of the users the following conditions are in place:
If s1 is user and female and s2 is user and female:
"A %s adoptou um animal da %s"
If s1 is user and female and s2 is user and male:
"A %s adoptou um animal do %s"
If s1 is user and male and s2 is user and female:
"O %s adoptou um animal da %s"
If s1 is user and male and s2 is user and male:
"O %s adoptou um animal do %s"